Complete Technical Paper Content — Face Recognition Projects
1. Executive Abstract, Problem Formulation & Background
Face Recognition Project This is a simplified version of the face recognition project, designed to be more focused on core functionality and easier to understand for presentation purposes. Features Interactive Interface : User-friendly command-line interface for all operations Multiple Model Architectures : Support for various face recognition architectures Baseline CNN: Simple CNN architecture CNN (ResNet18): Transfer learning with ResNet18 Siamese Networks: Facial verification with similarity learning Attention-based models: Self-attention for better feature extraction ArcFace: Advanced angular margin loss for improved performance Hybrid CNN-Transformer: Combined CNN and transformer architecture Ensemble models: Combine multiple models for better performance Preprocessing Pipeline : Face detection using MTCNN Face alignment and cropping Data augmentation Visualization of preprocessing steps Training Enhancements : Multiple learning rate schedulers Gradient clipping Early stopping Cross-validation Visualization Tools : Preprocessing visualization Confusion matrices ROC curves Precision-Recall curves Grad-CAM visualizations Person-by-person performance analysis for Siamese networks Hyperparameter Tuning : Optimize model parameters with Optuna Live Demo : Real-time face recognition using a webcam Datasets The project uses two datasets: Dataset1 : 36 celebrities, 49 images each Dataset2 : 18 celebrities, 100 images each Getting Started Prerequisites Python 3.8+ PyTorch 1.13+ CUDA-capable GPU (recommended but not required) Installation Clone the repository: git clone <repository-url> cd face-recognition-project git checkout simplified Create and activate a virtual environment (recommended): On macOS/Linux: python -m venv venv source venv/bin/activate On Windows: python -m venv venv venv \S cripts \a ctivate Upgrade pip and install the required packages: pip install --upgrade pip pip install --prefer-binary -r requirements.txt Note: Using --prefer-binary helps avoid build errors with packages like Pillow, especially on newer versions of Python. (Optional) Download the datasets: python run.py Then select option 1 to process raw data. The system will automatically download the datasets if they don't exist. Usage The project can be run in several modes: Interactive Mode python run.py This launches the interactive menu where you can: Process raw data Visualize preprocessing steps Train models Evaluate models Tune hyperparameters Run cross-validation List processed datasets and trained models Live Demo python run_app.py --browser Launches the interactive Streamlit face recognition demo using your webcam. The enhanced demo includes: Real-time face detection using MTCNN Face recognition with FaceNet embeddings Easy interface to add new faces to the recognition system Face tracking between frames for stable recognition Edit and manage known faces Recognition history tracking Automatic prompt for unrecognized faces Command Line Options --browser : Automatically open the app in a browser --port : Specify a port number (default: 8501) Example: python run_app.py --browser --port=8502 Interface The application has three main tabs in the sidebar: Controls : Start/stop webcam and adjust recognition settings Faces : Add, edit and view known faces History : View recognition history How to Use Start the webcam using the "Start Webcam" button in the Controls tab When a face is detected but not recognized, you'll be prompted to add it Enter a name for the detected face and click "Save" The face will now be recognized in future frames Use the edit buttons (✏️) next to known faces to update or delete them Cross-Validation python run.py cv Run k-fold cross-validation on a selected model and dataset. Hyperparameter Tuning The system includes an advanced hyperparameter tuning module that uses Optuna to optimize model performance. You can run hyperparameter tuning either through the interactive menu or via command line. Features Support for multiple model types (baseline, CNN, Siamese, Attention, ArcFace, Hybrid, Ensemble) Multiple optimizer options (AdamW, RAdam, SGD with momentum) Advanced learning rate schedulers (cosine, one-cycle, plateau) Trial-0 baseline support for better initial exploration Automatic checkpoint management Early stopping and pruning of unpromising trials Comprehensive hyperparameter search space including: Learning rate Batch size Weight decay Dropout rate Optimizer selection Scheduler selection and parameters Model-specific parameters (e.g., ArcFace margin, attention heads) Interactive Menu To run hyperparameter tuning through the interactive menu: Select option 5 (Hyperparameter Tuning) Choose a model type from the available options Select a processed dataset Configure tuning parameters: Number of trials (default: 20) Timeout in seconds (optional) Whether to use trial-0 baseline Number of checkpoints to keep per trial Start the tuning process Optionally train a model with the best parameters after tuning Command Line You can also run hyperparameter tuning via command line: python run.py hyperopt --model-type < model_type > --dataset < dataset_path > [options] Required arguments: --model-type : Type of model to tune (one of: baseline, cnn, siamese, attention, arcface, hybrid, ensemble) --dataset : Path to the processed dataset directory Optional arguments: --n-trials : Number of trials to run (default: 20) --timeout : Timeout in seconds (optional) --use-trial0-baseline : Use trial-0 baseline for first trial --keep-checkpoints : Number of best checkpoints to keep per trial (default: 1) --train-best : Train a model with the best parameters after tuning --epochs : Number of epochs for training with best parameters (default: 50) Example: # Run hyperparameter tuning with trial-0 baseline and train best model python run.py hyperopt --model-type arcface --dataset data/processed/lfw --use-trial0-baseline --train-best --epochs 100 # Run hyperparameter tuning with timeout python run.py hyperopt --model-type hybrid --dataset data/processed/celeba --n-trials 50 --timeout 3600 Trial-0 Baseline The system includes predefined baseline configurations for each model type, which can be used as a starting point for hyperparameter tuning. These baselines are based on common best practices and research findings. To use the trial-0 baseline: In interactive menu: Answer 'y' to "Use trial-0 baseline for first trial?" In command line: Add the --use-trial0-baseline flag Results After hyperparameter tuning completes, the system will: Display the best accuracy achieved Show the best hyperparameters found Optionally train a model with these parameters Save all trial results and checkpoints in the outputs/hyperopt_runs directory The best model checkpoints are saved with their trial number and validation accuracy in the filename. Interactive Menu Options Process Raw Data : Preprocess face images for training Visualize Preprocessing : See detailed visualizations of preprocessing steps Train Model : Train a face recognition model Evaluate Model : Test model performance with comprehensive metrics Tune Hyperparameters : Find optimal model parameters Cross-Validation : Evaluate model robustness with k-fold validation List Processed Datasets : View available preprocessed datasets List Trained Models : View trained models Exit : Exit the program Project Structure src/ - Source code interactive.py - Interactive command-line interface app.py - Live demo application base_config.py - Configuration settings and paths data_prep.py - Data preprocessing utilities data_utils.py - Dataset classes and utilities download_dataset.py - Dataset download functionality face_models.py - Model architecture implementations training.py - Model training functionality testing.py - Model evaluation and visualization cross_validation.py - Cross-validation implementation hyperparameter_tuning.py - Hyperparameter optimization data/ - Data directory raw/ - Raw unprocessed datasets processed/ - Preprocessed datasets outputs/ - Output directory checkpoints/ - Trained model weights and results preprocessing_visualization/ - Preprocessing visualizations plots/ - Performance visualizations run.py - Main entry point Model Details Baseline CNN A simple convolutional neural network with three convolutional layers followed by fully connected layers. CNN (ResNet18) Uses a pre-trained ResNet18 model, fine-tuned for face recognition. Siamese Network Two identical networks that learn similarity between pairs of images. Good for verification tasks. Attention Model Incorporates self-attention mechanisms to focus on important facial features. ArcFace Advanced face recognition model using angular margin loss for improved discrimination. Hybrid CNN-Transformer Combines convolutional layers with transformer blocks for improved performance. Ensemble Model Combines multiple models for improved accuracy through model averaging. Acknowledgments PyTorch team for the deep learning framework MTCNN developers for the face detection implementation FaceNet-PyTorch for inspiration and utility functions Author 👤 Henry Cooper 🎓 Computer Science & Mathematics, University of San Diego 📧 henrycooper@sandiego.edu 🔗 LinkedIn Feel free to reach out with questions, feedback, or collaboration ideas!
This is a simplified version of the face recognition project, designed to be more focused on core functionality and easier to understand for presentation purposes.
Note: Using --prefer-binary helps avoid build errors with packages like Pillow, especially on newer versions of Python.
Then select option 1 to process raw data. The system will automatically download the datasets if they don't exist.
Launches the interactive Streamlit face recognition demo using your webcam. The enhanced demo includes:
The system includes an advanced hyperparameter tuning module that uses Optuna to optimize model performance. You can run hyperparameter tuning either through the interactive menu or via command line.
2. Related Work, Literature Survey & Algorithmic Foundations
python run.py hyperopt --model-type < model_type > --dataset < dataset_path > [options]
# Run hyperparameter tuning with trial-0 baseline and train best model python run.py hyperopt --model-type arcface --dataset data/processed/lfw --use-trial0-baseline --train-best --epochs 100 # Run hyperparameter tuning with timeout python run.py hyperopt --model-type hybrid --dataset data/processed/celeba --n-trials 50 --timeout 3600
The system includes predefined baseline configurations for each model type, which can be used as a starting point for hyperparameter tuning. These baselines are based on common best practices and research findings. To use the trial-0 baseline:
The best model checkpoints are saved with their trial number and validation accuracy in the filename.
A simple convolutional neural network with three convolutional layers followed by fully connected layers.
Two identical networks that learn similarity between pairs of images. Good for verification tasks.
3. Dataset Ingestion, Preprocessing & Stochastic Augmentations
Advanced face recognition model using angular margin loss for improved discrimination.
👤 Henry Cooper 🎓 Computer Science & Mathematics, University of San Diego 📧 henrycooper@sandiego.edu 🔗 LinkedIn
A comprehensive face recognition system featuring multiple deep learning architectures (CNN, Siamese, ArcFace, Transformer-hybrid), interactive interface, advanced preprocessing pipeline, hyperparameter optimization, and real-time demo capabilities. Includes visualization tools, cross-validation, and support for multiple datasets.
deepface DeepFace is a lightweight face recognition and facial attribute analysis ( age , gender , emotion and race ) framework for python. It is a hybrid face recognition framework wrapping state-of-the-art models: VGG-Face , FaceNet , OpenFace , DeepFace , DeepID , ArcFace , Dlib , SFace , GhostFaceNet , Buffalo_L . A modern face recognition pipeline consists of 5 common stages: detect , align , normalize , represent and verify . While DeepFace handles all these common stages in the background, you don’t need to acquire in-depth knowledge about all the processes behind it. You can just call its verification, find or analysis function with a single line of code. Experiments show that human beings have 97.53% accuracy on facial recognition tasks whereas those models already reached and passed that accuracy level. Installation The easiest way to install deepface is to download it from PyPI . It's going to install the library itself and its prerequisites as well. DeepFace is framework agnostic: it can run on top of ONNX Runtime (default), TensorFlow or PyTorch . ONNX Runtime keeps the install lightweight (a few hundred MB), whereas TensorFlow and PyTorch typically add one to several GB, so install the tensorflow or pytorch extra only if you prefer one of those frameworks. # runs deepface on onnxruntime by default $ pip install deepface # or to run deepface on tensorflow # $ pip install "deepface[tensorflow]" # or to run deepface on pytorch # $ pip install "deepface[pytorch]" # manage backend deep learning framework if you have many # export DEEPFACE_BACKEND_ENGINE=onnx # or tensorflow, pytorch Alternatively, you can also install deepface from its source code. Source code may have new features not published in pip release yet. $ git clone https://github.com/serengil/deepface.git $ cd deepface $ pip install -e . # runs on onnxruntime, or pip install -e ".[tensorflow]" or pip install -e ".[pytorch]" Once you installed the library, then you will be able to import it and use its functionalities. from deepface import DeepFace 💡 Prefer not to install or manage infrastructure? You can use a managed API via deepface.dev . Face Verification - Demo This function determines whether two facial images belong to the same person or to different individuals. The function returns a dictionary, where the key of interest is verified : True indicates the images are of the same person, while False means they are of different people. result : dict = DeepFace . verify ( img1_path = "img1.jpg" , img2_path = "img2.jpg" ) Face recognition - Tutorial , Demo Face recognition requires applying face verification many times. DeepFace provides an out-of-the-box find function that searches for the identity of an input image within a specified folder, s3 or ftp. dfs : List [ pd . DataFrame ] = DeepFace . find ( img_path = "img1.jpg" , db_path = "C:/my_db" ) Database-backed face recognition - Demo DeepFace supports database-backed operations for scalable face recognition, allowing embeddings to be explicitly registered in a database rather than processed on-the-fly or stored in local file structures. Supported backends include postgres , mongo , neo4j , pgvector , pinecone , milvus, qdrant, weaviate, sqlite, oracle, mssql, db2, redis, cassandra, and mysql. identify serves as a database-backed alternative to verify for 1:1 identity verification. search serves as a database-backed alternative to find for 1:N search with optional approximate nearest neighbor support. # register images into the database _ = DeepFace . register ( img = "img1.jpg" ) _ = DeepFace . register ( img = [ "img2.jpg" , "img3.jpg" ]) # identify a given image with a registered face result : dict = DeepFace . identify ( img = "target.jpg" , identity_id = "17" ) # perform exact search dfs : List [ pd . DataFrame ] = DeepFace . search ( img = "target.jpg" ) # building index is required for ann search on non-vector dbs (e.g. postgres, mongo), but skipped for native vector dbs _ = DeepFace . build_index () # perform approximate nearest neighbor search dfs : List [ pd . DataFrame ] = DeepFace . search ( img = "target.jpg" , search_method = "ann" ) Facial Attribute Analysis - Demo DeepFace also comes with a strong facial attribute analysis module including age , gender , facial expression (including angry, fear, neutral, sad, disgust, happy and surprise) and race (including asian, white, middle eastern, indian, latino and black) predictions. objs : List [ dict ] = DeepFace . analyze ( img_path = "img4.jpg" , actions = [ 'age' , 'gender' , 'race' , 'emotion' ] ) Age model got ± 4.65 MAE; gender model got 97.44% accuracy, 96.29% precision and 95.05% recall as mentioned in its tutorial . Real Time Analysis - Demo , React Demo part-i , React Demo part-ii You can run deepface for real time videos as well. Stream function will access your webcam and apply both face recognition and facial attribute analysis. The function starts to analyze a frame if it can focus a face sequentially 5 frames. Then, it shows results 5 seconds. DeepFace . stream ( db_path = "C:/database" ) Even though face recognition is based on one-shot learning, you can use multiple face pictures of a person as well. You should rearrange your directory structure as illustrated below. user ├── database │ ├── Alice │ │ ├── Alice1.jpg │ │ ├── Alice2.jpg │ ├── Bob.jpg │ ├── Charlie │ │ ├── Charlie.jpg Here, you can also find some real time demos for various models: Task Model Demo Facial Recognition DeepFace Video Facial Recognition FaceNet Video Facial Recognition VGG-Face Video Facial Recognition OpenFace Video Age & Gender Default Video Race & Ethnicity Default Video Emotion Default Video Celebrity Look-Alike Default Video If you intend to perform face verification or analysis tasks directly from your browser, deepface-react-ui is a separate repository built using ReactJS depending on deepface api. Embeddings - Tutorial , Demo Face recognition models basically represent facial images as multi-dimensional vectors. Sometimes, you need those embedding vectors directly. DeepFace comes with a dedicated representation function. embedding_objs : List [ dict ] = DeepFace . represent ( img_path = "img.jpg" ) Face recognition models - Demo DeepFace is a hybrid face recognition package. It currently wraps many state-of-the-art face recognition models: VGG-Face , FaceNet , OpenFace , DeepFace , DeepID , ArcFace , Dlib , SFace , GhostFaceNet and Buffalo_L . The default configuration uses VGG-Face model. models = [ "VGG-Face" , "Facenet" , "Facenet512" , "OpenFace" , "DeepFace" , "DeepID" , "ArcFace" , "Dlib" , "SFace" , "GhostFaceNet" , "Buffalo_L" , ] result = DeepFace . verify ( img1_path = "img1.jpg" , img2_path = "img2.jpg" , model_name = models [ 0 ] ) dfs = DeepFace . find ( img_path = "img1.jpg" , db_path = "C:/my_db" , model_name = models [ 1 ] ) embeddings = DeepFace . represent ( img_path = "img.jpg" , model_name = models [ 2 ] ) See BENCHMARKS for their accuracies. Face Detection and Alignment - Demo Face detection and alignment are important early stages of a modern face recognition pipeline. Experiments show that detection increases the face recognition accuracy up to 42%, while alignment increases it up to 6%. OpenCV , Ssd , Dlib , MtCnn , Faster MtCnn , RetinaFace , MediaPipe , Yolo , YuNet and CenterFace detectors are wrapped in deepface. All deepface functions accept optional detector backend and align input arguments. You can switch among those detectors and alignment modes with these arguments. OpenCV is the default detector and alignment is on by default. backends = [ 'opencv' , 'ssd' , 'dlib' , 'mtcnn' , 'fastmtcnn' , 'retinaface' , 'mediapipe' , 'yolov8n' , 'yolov8m' , 'yolov8l' , 'yolov11n' , 'yolov11s' , 'yolov11m' , 'yolov11l' , 'yolov12n' , 'yolov12s' , 'yolov12m' , 'yolov12l' , 'yunet' , 'centerface' , ] detector = backends [ 3 ] align = True obj = DeepFace . verify ( img1_path = "img1.jpg" , img2_path = "img2.jpg" , detector_backend = detector , align = align ) dfs = DeepFace . find ( img_path = "img.jpg" , db_path = "my_db" , detector_backend = detector , align = align ) embedding_objs = DeepFace . represent ( img_path = "img.jpg" , detector_backend = detector , align = align ) demographies = DeepFace . analyze ( img_path = "img4.jpg" , detector_backend = detector , align = align ) face_objs = DeepFace . extract_faces ( img_path = "img.jpg" , detector_backend = detector , align = align ) RetinaFace overperforms among all face detection models in the portfolio. Running RetinaFace On The Yellow Angels - Fenerbahce Women's Volleyball Team See BENCHMARKS for their accuracies. Face Anti Spoofing - Demo DeepFace also includes an anti-spoofing analysis module to understand given image is real or fake. To activate this feature, set the anti_spoofing argument to True in any DeepFace tasks. # anti spoofing test in face detection face_objs = DeepFace . extract_faces ( img_path = "dataset/img1.jpg" , anti_spoofing = True ) assert all ( face_obj [ "is_real" ] is True for face_obj in face_objs ) # anti spoofing test in real time analysis DeepFace . stream ( db_path = "C:/database" , anti_spoofing = True ) Similarity - Demo Face recognition models are regular convolutional neural networks and they are responsible to represent faces as vectors. We expect that a face pair of same person should be more similar than a face pair of different persons. Similarity could be calculated by different metrics such as Cosine Similarity , Angular Distance, Euclidean Distance or L2 normalized Euclidean. The default configuration uses cosine similarity. According to experiments , no distance metric is overperforming than other. metrics = [ "cosine" , "euclidean" , "euclidean_l2" , "angular" ] result = DeepFace . verify ( img1_path = "img1.jpg" , img2_path = "img2.jpg" , distance_metric = metrics [ 1 ] ) dfs = DeepFace . find ( img_path = "img1.jpg" , db_path = "C:/my_db" , distance_metric = metrics [ 2 ] ) API - Demo , Docker Demo DeepFace serves an API as well - see api folder for more details. You can clone deepface source code and run the api with the following command. It will use gunicorn server to get a rest service up. In this way, you can call deepface from an external system such as mobile app or web. # running the service directly pip install -e " .[api] " # or pip install "deepface[api]" cd scripts && ./service.sh # running the service via docker cd scripts && ./dockerize.sh Face verification, facial attribute analysis, vector representation and register & search functions are covered in the API. The API accepts images as file uploads (via form data), or as exact image paths, URLs, or base64-encoded strings (via either JSON or form data). $ curl -X POST http://localhost:5005/represent \ -d ' {"model_name":"Facenet", "img":"img1.jpg"} ' $ curl -X POST http://localhost:5005/verify \ -d ' {"img1":"img1.jpg", "img2":"img3.jpg"} ' $ curl -X POST http://localhost:5005/analyze \ -d ' {"img": "img2.jpg", "actions": ["age", "gender"]} ' $ curl -X POST http://localhost:5005/register \ -d ' {"model_name":"Facenet", "img":"img18.jpg"} ' $ curl -X POST http://localhost:5005/search \ -d ' {"img":"img1.jpg", "model_name":"Facenet"} ' gRPC API DeepFace can be served over gRPC as well. It covers the same functions as the REST API, and its contract is defined in deepface.proto . # install grpc dependencies $ pip install -e " .[grpc] " # or pip install "deepface[grpc]" # generate stubs from proto file $ make grpc # run the grpc server $ make grpc-server Images can be sent either as raw bytes of an image file, or as exact image paths, URLs or base64-encoded strings. import grpc from google . protobuf . json_format import MessageToDict from deepface . api . proto import deepface_pb2 , deepface_pb2_grpc stub = deepface_pb2_grpc . DeepFaceServiceStub ( grpc . insecure_channel ( "localhost:50051" )) with open ( "img1.jpg" , "rb" ) as f : img1 = deepface_pb2 . Image ( content = f . read ()) with open ( "img2.jpg" , "rb" ) as f : img2 = deepface_pb2 . Image ( content = f . read ()) response = stub . Verify ( deepface_pb2 . VerifyRequest ( img1 = img1 , img2 = img2 )) result = MessageToDict ( response . result ) DeepFace Cloud - Demo Don’t want to host and scale DeepFace yourself? deepface.dev provides a managed API built on top of DeepFace. One API for verification, embeddings, and vector comparison Docs and machine-readable agent docs: docs.deepface.dev MCP endpoint: https://deepface.dev/mcp using a dedicated MCP key Usage-based pricing that scales from testing to production Extended Applications DeepFace isn't only for facial recognition, it can also be used for fun and insightful applications such as Find Your Celebrity Look-Alike - Demo , Real-Time Demo , Tutorial DeepFace can analyze your facial features and match them with celebrities, letting you discover which famous personality you resemble the most. Find Which Parent a Child Look More - Demo , Tutorial DeepFace can also be used to compare a child's face to their parents' or relatives' faces to determine which one the child resembles more. Support There are many ways to support a project - starring⭐️ the GitHub repo is just one 🙏 It really helps the project get discovered by more people. If you do like this work, you can also support it financially on Patreon , GitHub Sponsors or Buy Me a Coffee . Citation Please cite deepface in your publications if it helps your research. Here is its BibTex entry: @article { deepface , title = { Boosted LightFace: A Hybrid DNN and GBM Model for Boosted Facial Recognition } , author = { Serengil, Sefik Ilkin and Ozpinar, Alper } , journal = { Gazi University Journal of Science } , volume = { 39 } , number = { 1 } , pages = { 452-466 } , year = { 2026 } , doi = { 10.35378/gujs.1794891 } , url = { https://dergipark.org.tr/en/pub/gujs/article/1794891 } , publisher = { Gazi University } } Also, if you use deepface in your GitHub projects, please add deepface in the requirements.txt . Licence DeepFace is licensed under the MIT License - see LICENSE for more details. DeepFace wraps some external face recognition models: VGG-Face , Facenet (both 128d and 512d), OpenFace , DeepFace , DeepID , ArcFace , Dlib , SFace , GhostFaceNet and Buffalo_L . Besides, age, gender and race / ethnicity models were trained on the backbone of VGG-Face with transfer learning. Similarly, DeepFace wraps many face detectors: OpenCv , Ssd , Dlib , MtCnn , Fast MtCnn , RetinaFace , MediaPipe , YuNet , Yolo and CenterFace . Finally, DeepFace is optionally using face anti spoofing to determine the given images are real or fake. License types will be inherited when you intend to utilize those models. Please check the license types of those models for production purposes. DeepFace logo is created by Adrien Coquet and it is licensed under Creative Commons: By Attribution 3.0 License .
DeepFace is a lightweight face recognition and facial attribute analysis ( age , gender , emotion and race ) framework for python. It is a hybrid face recognition framework wrapping state-of-the-art models: VGG-Face , FaceNet , OpenFace , DeepFace , DeepID , ArcFace , Dlib , SFace , GhostFaceNet , Buffalo_L .
A modern face recognition pipeline consists of 5 common stages: detect , align , normalize , represent and verify . While DeepFace handles all these common stages in the background, you don’t need to acquire in-depth knowledge about all the processes behind it. You can just call its verification, find or analysis function with a single line of code.
4. Neural Network Backbone, Layer Specifications & Loss Formulations
Experiments show that human beings have 97.53% accuracy on facial recognition tasks whereas those models already reached and passed that accuracy level.
The easiest way to install deepface is to download it from PyPI . It's going to install the library itself and its prerequisites as well.
DeepFace is framework agnostic: it can run on top of ONNX Runtime (default), TensorFlow or PyTorch . ONNX Runtime keeps the install lightweight (a few hundred MB), whereas TensorFlow and PyTorch typically add one to several GB, so install the tensorflow or pytorch extra only if you prefer one of those frameworks.
# runs deepface on onnxruntime by default $ pip install deepface # or to run deepface on tensorflow # $ pip install "deepface[tensorflow]" # or to run deepface on pytorch # $ pip install "deepface[pytorch]" # manage backend deep learning framework if you have many # export DEEPFACE_BACKEND_ENGINE=onnx # or tensorflow, pytorch
Alternatively, you can also install deepface from its source code. Source code may have new features not published in pip release yet.
$ git clone https://github.com/serengil/deepface.git $ cd deepface $ pip install -e . # runs on onnxruntime, or pip install -e ".[tensorflow]" or pip install -e ".[pytorch]"
5. Training Protocol, Convergence Behavior & Experimental Evaluation
Once you installed the library, then you will be able to import it and use its functionalities.
💡 Prefer not to install or manage infrastructure? You can use a managed API via deepface.dev .
This function determines whether two facial images belong to the same person or to different individuals. The function returns a dictionary, where the key of interest is verified : True indicates the images are of the same person, while False means they are of different people.
Face recognition requires applying face verification many times. DeepFace provides an out-of-the-box find function that searches for the identity of an input image within a specified folder, s3 or ftp.
dfs : List [ pd . DataFrame ] = DeepFace . find ( img_path = "img1.jpg" , db_path = "C:/my_db" )
DeepFace supports database-backed operations for scalable face recognition, allowing embeddings to be explicitly registered in a database rather than processed on-the-fly or stored in local file structures. Supported backends include postgres , mongo , neo4j , pgvector , pinecone , milvus, qdrant, weaviate, sqlite, oracle, mssql, db2, redis, cassandra, and mysql.
Model Figures & Evaluation Curves (4 Images)
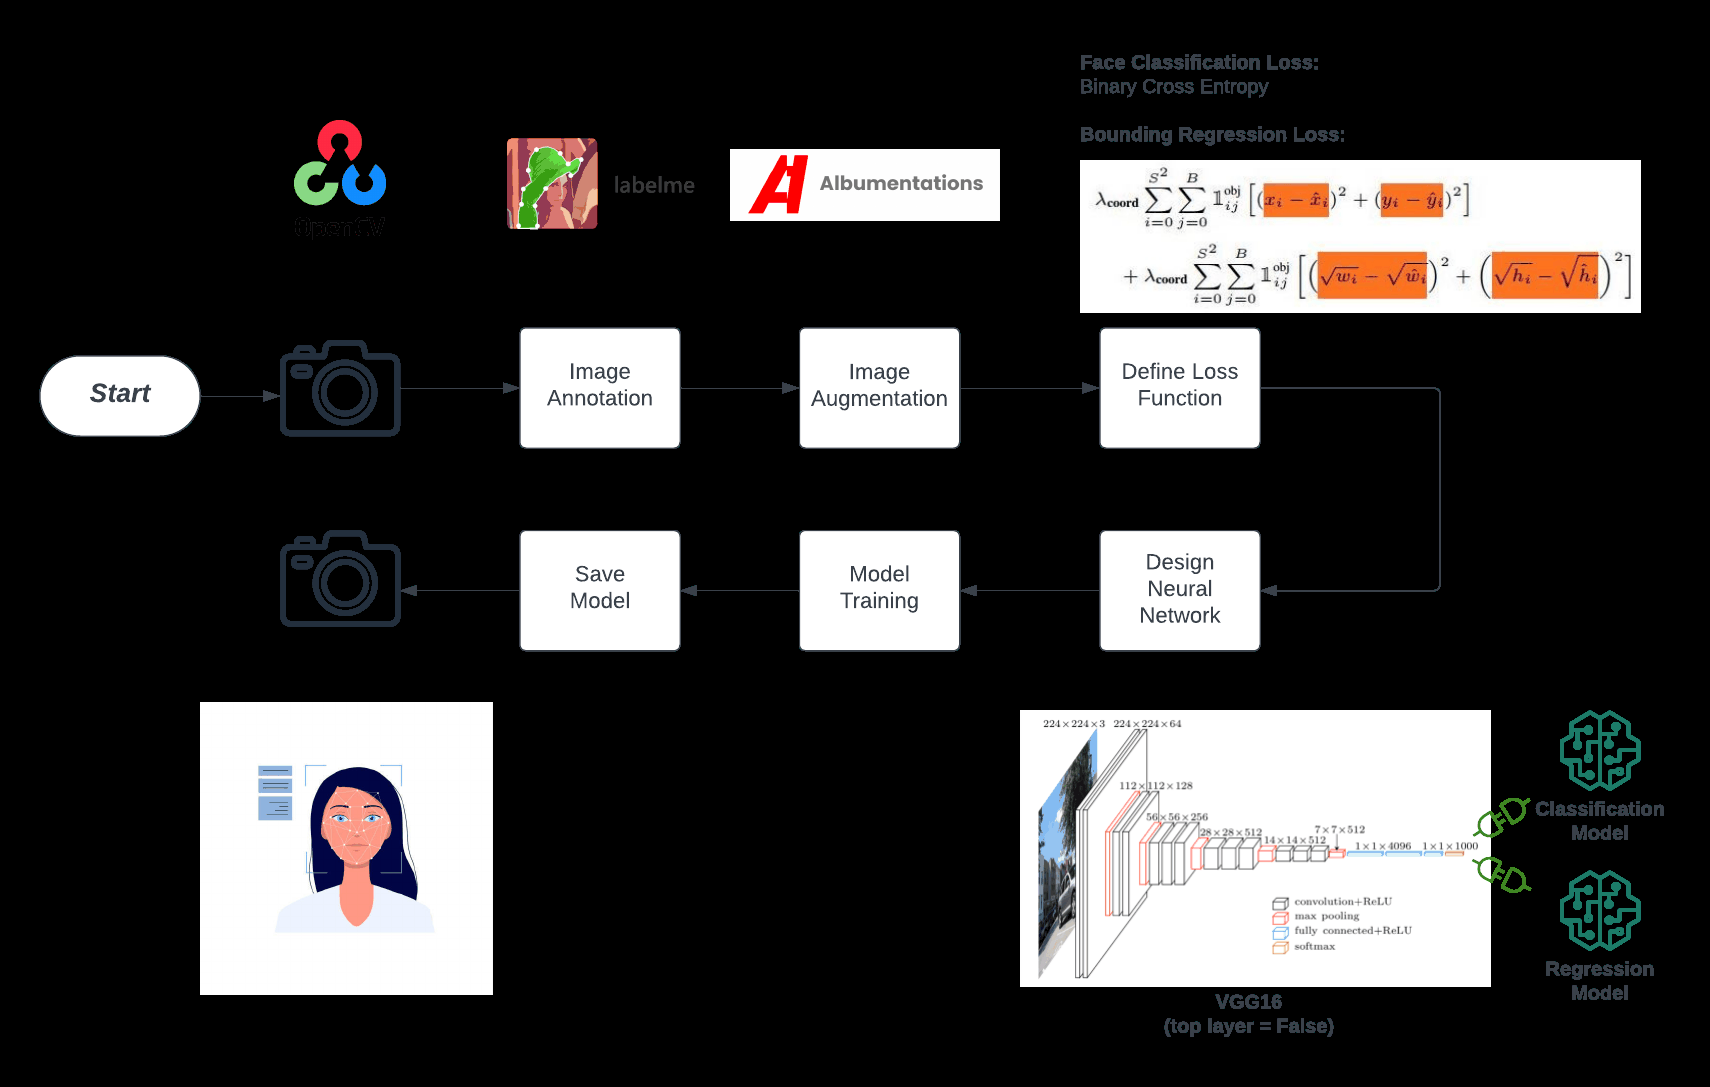
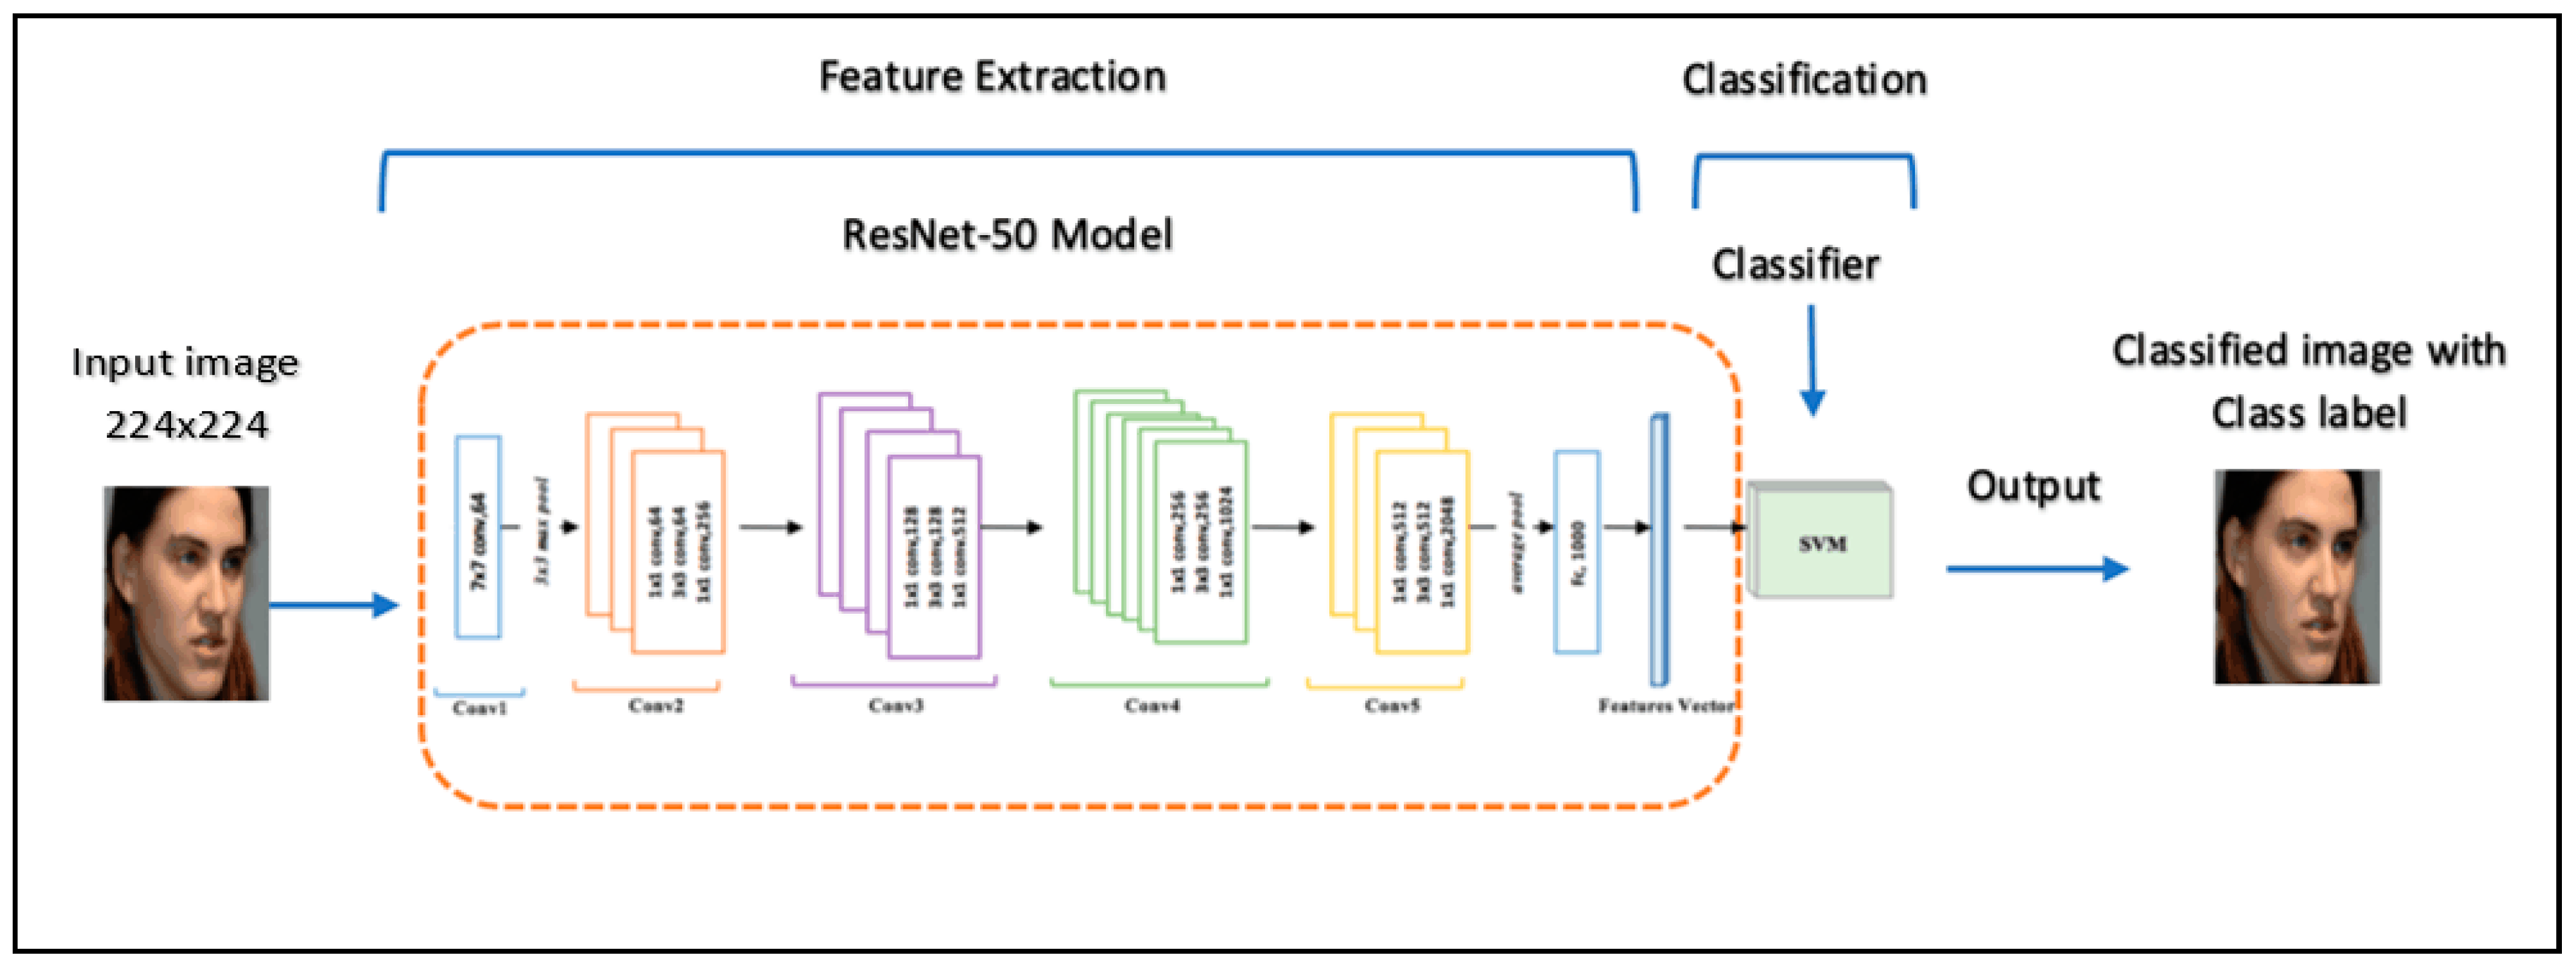
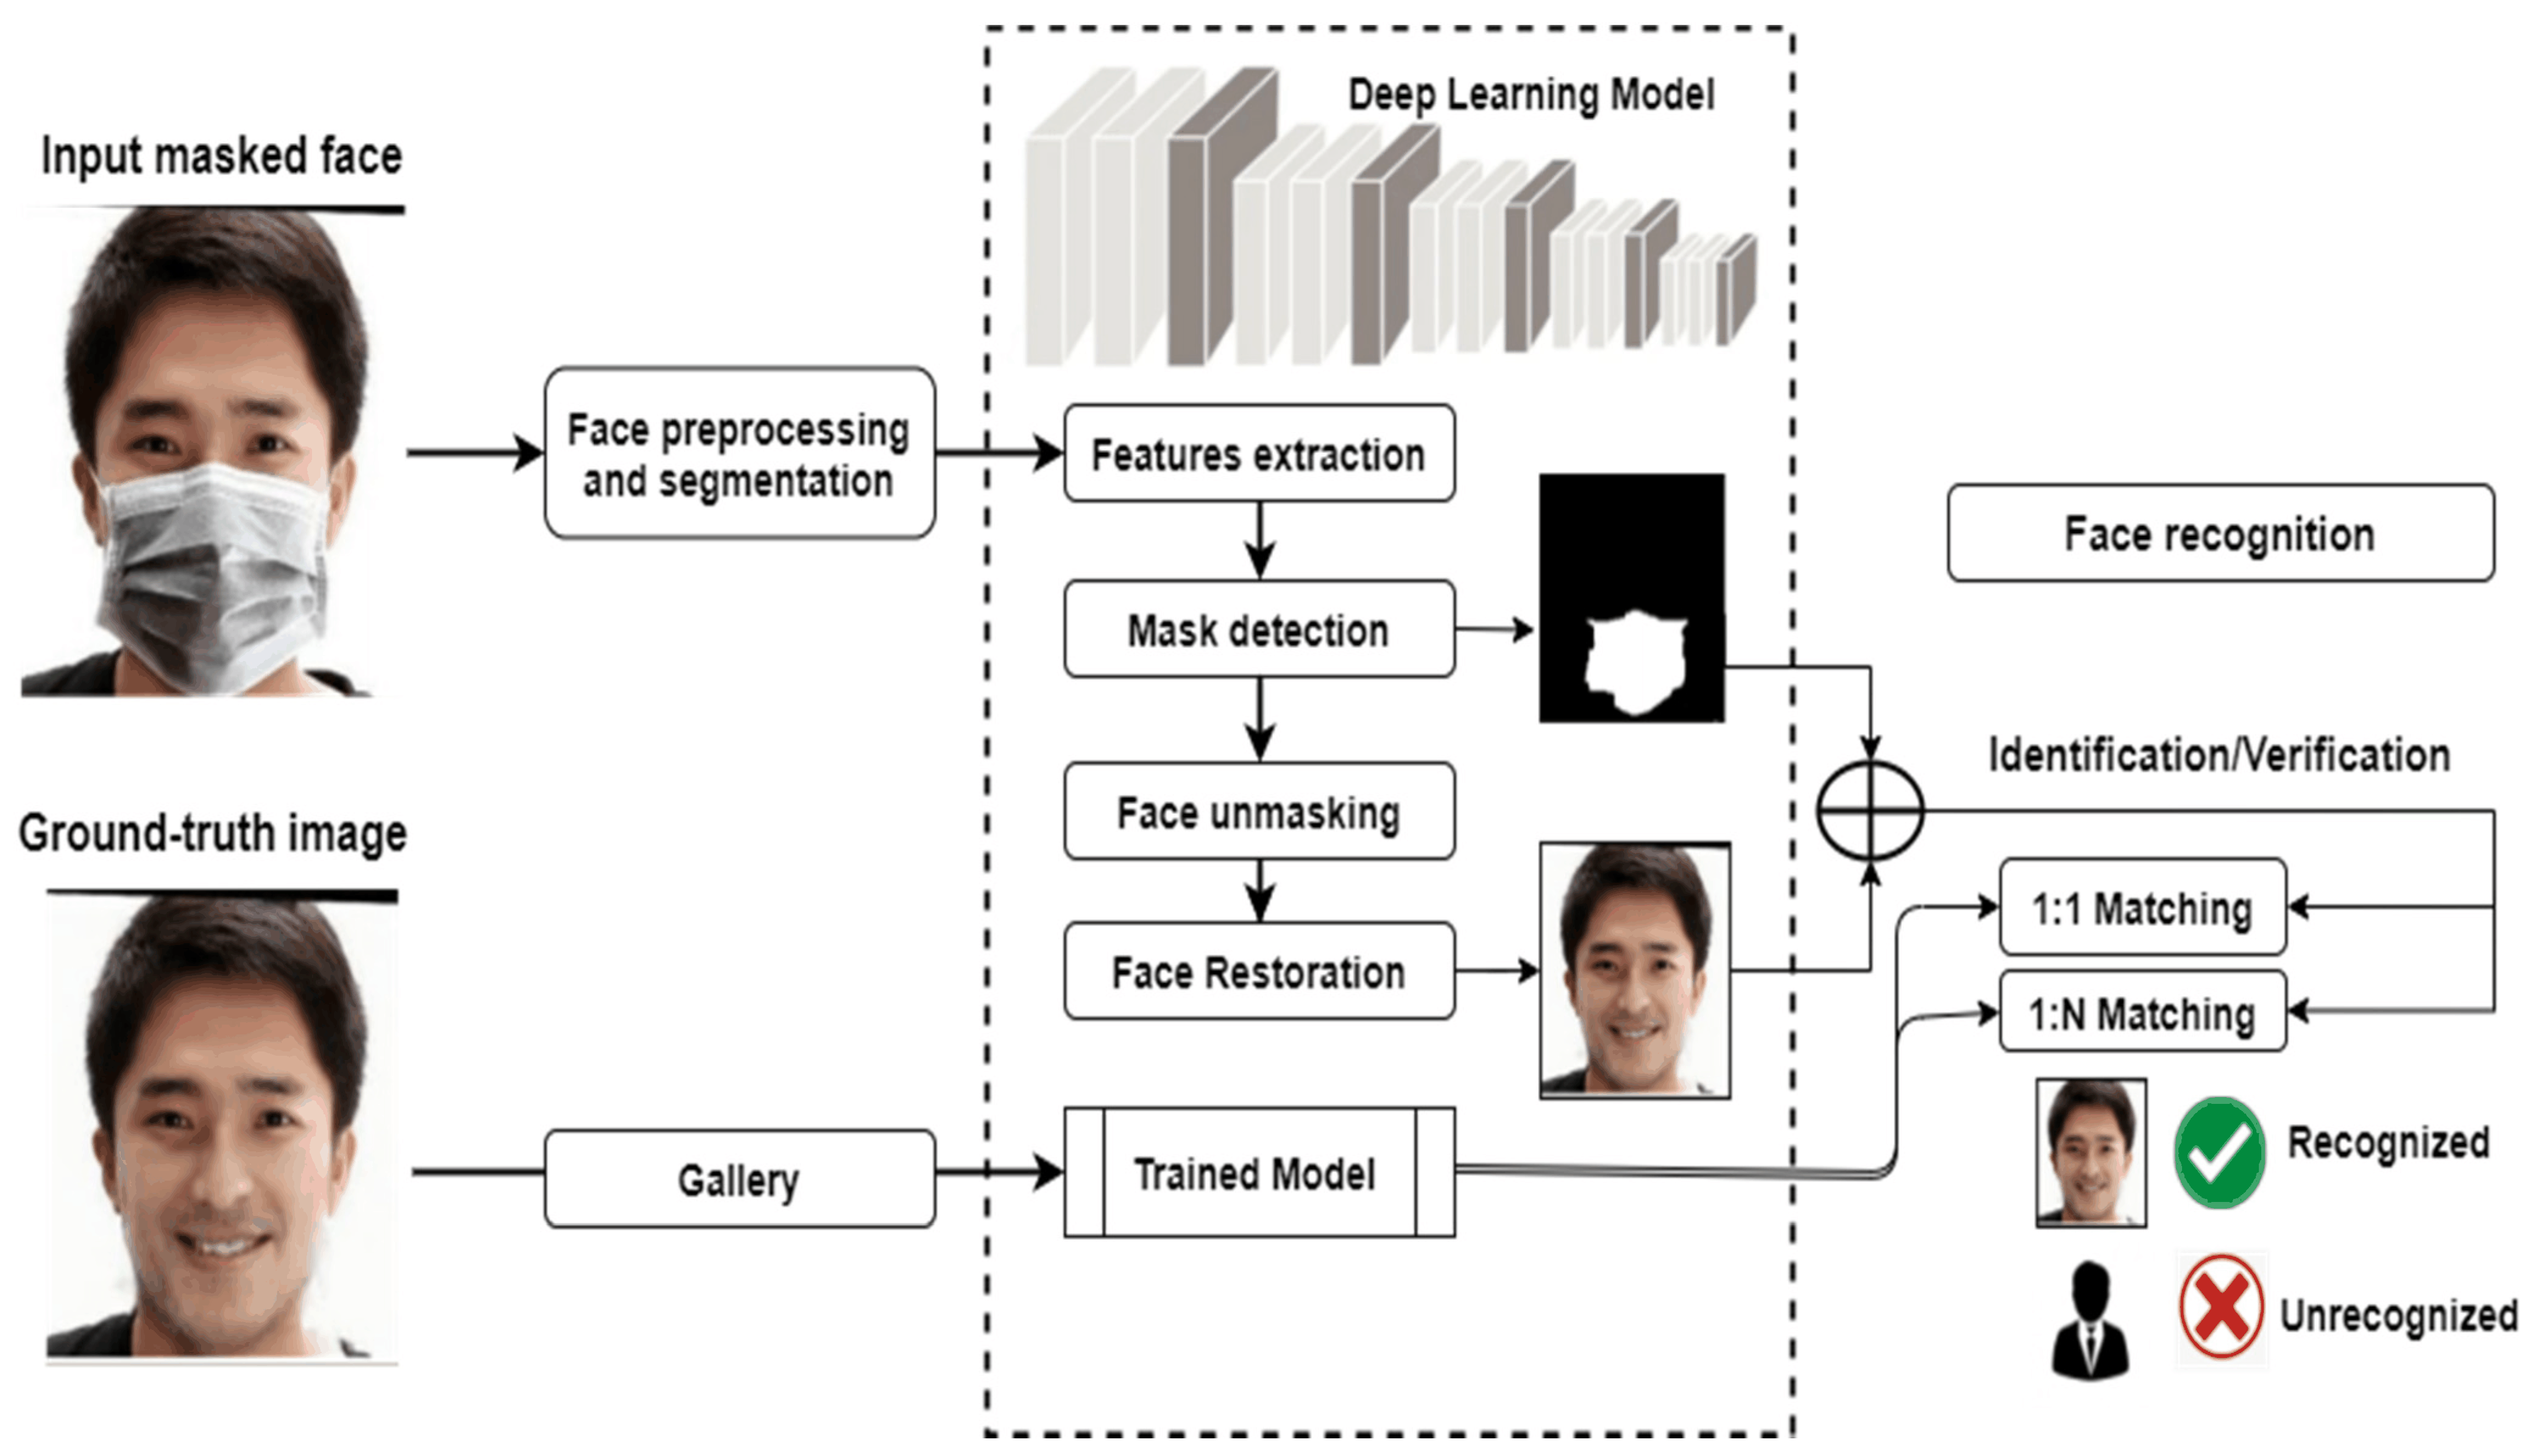
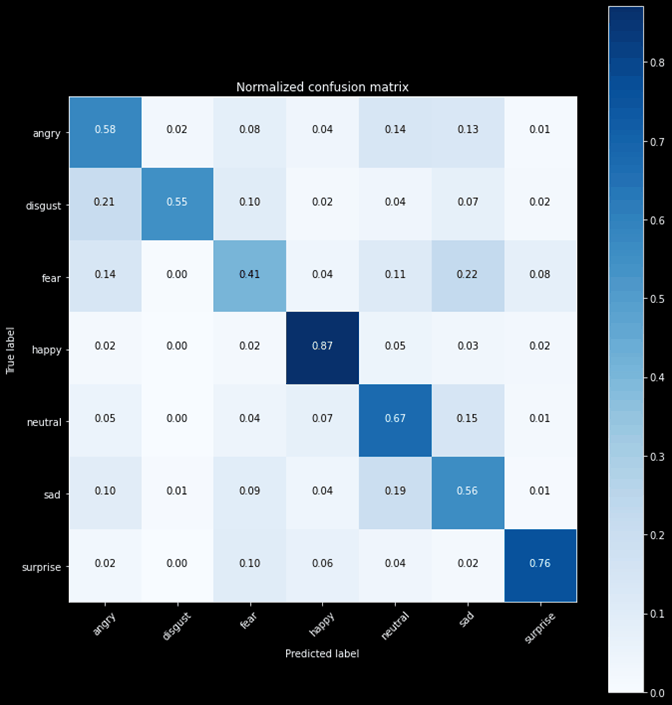
Deep Learning Execution Pipeline
(Preprocessing)
(Feature Extraction)
(Self-Attention)
(Loss Optimization)