Complete Technical Paper Content — Pytorch Mobile Ai
1. Executive Abstract, Problem Formulation & Background
Table of Contents # Fundamental Concepts Usage Methods Common Practices Best Practices Conclusion References Fundamental Concepts # TorchScript # TorchScript is a way to create serializable and optimizable models from PyTorch code. It serves as an intermediate representation of a PyTorch model that can be understood by both Python and mobile devices. There are two ways to convert a PyTorch model to TorchScript: tracing and scripting. Tracing : Tracing records the operations performed on a model given a set of input tensors. It is suitable for models with static control flow. import torch import torchvision # Load a pre - trained model model = torchvision.models.resnet18( pretrained = True ) model.eval() # Create a sample input tensor input_tensor = torch.randn( 1 , 3 , 224 , 224 ) # Trace the model traced_model = torch.jit.trace(model, input_tensor) Scripting : Scripting analyzes the Python source code of the model and converts it to TorchScript. It can handle models with dynamic control flow. import torch class MyModel ( torch . nn . Module ): def __init__ (self): super (MyModel, self ). __init__ () self .linear = torch.nn.Linear( 10 , 1 ) def forward (self, x): if x.sum() > 0 : x = self .linear(x) return x model = MyModel() scripted_model = torch.jit.script(model) Model Quantization # Quantization is the process of reducing the precision of the model's weights and activations from floating-point numbers to lower-precision data types such as 8 - bit integers. This reduces the model size and computational requirements, making it more suitable for mobile devices. import torch import torchvision model = torchvision.models.resnet18( pretrained = True ) model.eval() # Quantize the model quantized_model = torch.quantization.quantize_dynamic( model, {torch.nn.Linear}, dtype = torch.qint8 ) Usage Methods # Exporting a Model for Mobile # Once you have a TorchScript model, you can export it for mobile use. import torch import torchvision model = torchvision.models.resnet18( pretrained = True ) model.eval() input_tensor = torch.randn( 1 , 3 , 224 , 224 ) traced_model = torch.jit.trace(model, input_tensor) # Save the traced model traced_model.save( 'resnet18_traced.pt' ) Using the Model on Android # To use the exported model on Android, you need to add the PyTorch Android library to your Android project. Add the PyTorch Android library to your build.gradle file: implementation 'org.pytorch:pytorch_android:1.9.0' implementation 'org.pytorch:pytorch_android_torchvision:1.9.0' Load and run the model in Java code: import org.pytorch.Module; import org.pytorch.Tensor; import org.pytorch.torchvision.TensorImageUtils; import android.content.Context; import android.content.res.AssetManager; import android.graphics.Bitmap; import android.graphics.BitmapFactory; import java.io.File; import java.io.FileOutputStream; import java.io.IOException; import java.io.InputStream; import java.io.OutputStream; public class PyTorchModel { private Module module; public PyTorchModel (Context context , AssetManager assetManager ) { try { File modelFile = new File (context. getFilesDir (), "resnet18_traced.pt" ); copyFileFromAssets (assetManager, "resnet18_traced.pt" , modelFile); module = Module. load (modelFile. getAbsolutePath ()); } catch (IOException e ) { e. printStackTrace (); } } private void copyFileFromAssets (AssetManager assetManager , String assetName , File outputFile ) throws IOException { InputStream in = assetManager. open (assetName); OutputStream out = new FileOutputStream (outputFile); byte [] buffer = new byte [ 1024 ]; int read; while ((read = in. read (buffer)) != - 1 ) { out. write (buffer, 0 , read); } in. close (); out. close (); } public float [] runModel (Bitmap bitmap ) { Tensor inputTensor = TensorImageUtils. bitmapToFloat32Tensor (bitmap, TensorImageUtils.TORCHVISION_NORM_MEAN_RGB, TensorImageUtils.TORCHVISION_NORM_STD_RGB); Tensor outputTensor = module. forward (IValue. from (inputTensor)). toTensor (); float [] scores = outputTensor. getDataAsFloatArray (); return scores; } } Using the Model on iOS # To use the exported model on iOS, you need to add the PyTorch iOS library to your iOS project. Add the PyTorch iOS library to your Xcode project using CocoaPods: pod 'LibTorch-Lite' Load and run the model in Swift code: import UIKit import LibTorch class ViewController : UIViewController { var module: TorchModule ! override func viewDidLoad () { super . viewDidLoad () do { let modelPath = Bundle.main. path ( forResource : "resnet18_traced" , ofType : "pt" ) ! module = try TorchModule ( fileURLWithPath : modelPath) } catch { print ( "Error loading model: \(error) " ) } } func runModel () { let inputTensor = Tensor ( randn :[ 1 , 3 , 224 , 224 ]) let outputTensor = try! module. forward (inputTensor) let output = outputTensor. data () print (output) } } Common Practices # Model Selection # Choose a model architecture that is suitable for mobile devices. Lightweight architectures such as MobileNet, ShuffleNet, and EfficientNet are good choices as they have fewer parameters and lower computational requirements. import torchvision # Load a lightweight model model = torchvision.models.mobilenet_v2( pretrained = True ) Data Preprocessing # Proper data preprocessing is crucial for getting accurate results. Normalize the input data to the same range as the training data. import torchvision.transforms as transforms transform = transforms.Compose([ transforms.Resize( 256 ), transforms.CenterCrop( 224 ), transforms.ToTensor(), transforms.Normalize( mean = [ 0.485 , 0.456 , 0.406 ], std = [ 0.229 , 0.224 , 0.225 ]) ]) Best Practices # Memory Management # On mobile devices, memory is limited. Use techniques such as releasing unused tensors and using in-place operations to reduce memory usage. import torch x = torch.randn( 10 , 10 ) y = torch.randn( 10 , 10 ) # In - place addition x.add_(y) Performance Optimization # Profile your model on the target device to identify performance bottlenecks. Use techniques such as model quantization and pruning to optimize the model's performance. Conclusion # PyTorch Mobile provides a powerful and flexible way to deploy PyTorch models on mobile and edge devices. By understanding the fundamental concepts, usage methods, common practices, and best practices, you can efficiently develop AI-powered mobile applications. Whether you are building an image classification app or a natural language processing app, PyTorch Mobile can help you achieve your goals. References # PyTorch Mobile official documentation: https://pytorch.org/mobile/home/ PyTorch official documentation: https://pytorch.org/docs/stable/index.html TorchScript documentation: https://pytorch.org/docs/stable/jit.html 2025-11
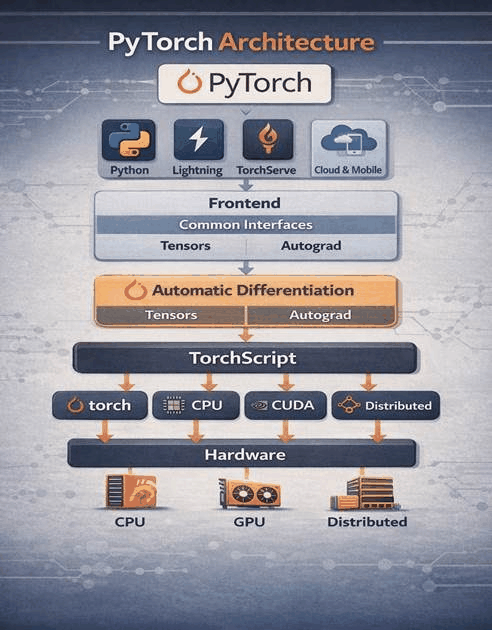
TorchScript is a way to create serializable and optimizable models from PyTorch code. It serves as an intermediate representation of a PyTorch model that can be understood by both Python and mobile devices. There are two ways to convert a PyTorch model to TorchScript: tracing and scripting.
Tracing : Tracing records the operations performed on a model given a set of input tensors. It is suitable for models with static control flow.
import torch import torchvision # Load a pre - trained model model = torchvision.models.resnet18( pretrained = True ) model.eval() # Create a sample input tensor input_tensor = torch.randn( 1 , 3 , 224 , 224 ) # Trace the model traced_model = torch.jit.trace(model, input_tensor)
2. Related Work, Literature Survey & Algorithmic Foundations
Scripting : Scripting analyzes the Python source code of the model and converts it to TorchScript. It can handle models with dynamic control flow.
import torch class MyModel ( torch . nn . Module ): def __init__ (self): super (MyModel, self ). __init__ () self .linear = torch.nn.Linear( 10 , 1 ) def forward (self, x): if x.sum() > 0 : x = self .linear(x) return x model = MyModel() scripted_model = torch.jit.script(model)
Quantization is the process of reducing the precision of the model's weights and activations from floating-point numbers to lower-precision data types such as 8 - bit integers. This reduces the model size and computational requirements, making it more suitable for mobile devices.
import torch import torchvision model = torchvision.models.resnet18( pretrained = True ) model.eval() # Quantize the model quantized_model = torch.quantization.quantize_dynamic( model, {torch.nn.Linear}, dtype = torch.qint8 )
3. Dataset Ingestion, Preprocessing & Stochastic Augmentations
import torch import torchvision model = torchvision.models.resnet18( pretrained = True ) model.eval() input_tensor = torch.randn( 1 , 3 , 224 , 224 ) traced_model = torch.jit.trace(model, input_tensor) # Save the traced model traced_model.save( 'resnet18_traced.pt' )
To use the exported model on Android, you need to add the PyTorch Android library to your Android project.
implementation 'org.pytorch:pytorch_android:1.9.0' implementation 'org.pytorch:pytorch_android_torchvision:1.9.0'
import org.pytorch.Module; import org.pytorch.Tensor; import org.pytorch.torchvision.TensorImageUtils; import android.content.Context; import android.content.res.AssetManager; import android.graphics.Bitmap; import android.graphics.BitmapFactory; import java.io.File; import java.io.FileOutputStream; import java.io.IOException; import java.io.InputStream; import java.io.OutputStream; public class PyTorchModel { private Module module; public PyTorchModel (Context context , AssetManager assetManager ) { try { File modelFile = new File (context. getFilesDir (), "resnet18_traced.pt" ); copyFileFromAssets (assetManager, "resnet18_traced.pt" , modelFile); module = Module. load (modelFile. getAbsolutePath ()); } catch (IOException e ) { e. printStackTrace (); } } private void copyFileFromAssets (AssetManager assetManager , String assetName , File outputFile ) throws IOException { InputStream in = assetManager. open (assetName); OutputStream out = new FileOutputStream (outputFile); byte [] buffer = new byte [ 1024 ]; int read; while ((read = in. read (buffer)) != - 1 ) { out. write (buffer, 0 , read); } in. close (); out. close (); } public float [] runModel (Bitmap bitmap ) { Tensor inputTensor = TensorImageUtils. bitmapToFloat32Tensor (bitmap, TensorImageUtils.TORCHVISION_NORM_MEAN_RGB, TensorImageUtils.TORCHVISION_NORM_STD_RGB); Tensor outputTensor = module. forward (IValue. from (inputTensor)). toTensor (); float [] scores = outputTensor. getDataAsFloatArray (); return scores; } }
4. Neural Network Backbone, Layer Specifications & Loss Formulations
To use the exported model on iOS, you need to add the PyTorch iOS library to your iOS project.
import UIKit import LibTorch class ViewController : UIViewController { var module: TorchModule ! override func viewDidLoad () { super . viewDidLoad () do { let modelPath = Bundle.main. path ( forResource : "resnet18_traced" , ofType : "pt" ) ! module = try TorchModule ( fileURLWithPath : modelPath) } catch { print ( "Error loading model: \(error) " ) } } func runModel () { let inputTensor = Tensor ( randn :[ 1 , 3 , 224 , 224 ]) let outputTensor = try! module. forward (inputTensor) let output = outputTensor. data () print (output) } }
Choose a model architecture that is suitable for mobile devices. Lightweight architectures such as MobileNet, ShuffleNet, and EfficientNet are good choices as they have fewer parameters and lower computational requirements.
import torchvision # Load a lightweight model model = torchvision.models.mobilenet_v2( pretrained = True )
5. Training Protocol, Convergence Behavior & Experimental Evaluation
Proper data preprocessing is crucial for getting accurate results. Normalize the input data to the same range as the training data.
import torchvision.transforms as transforms transform = transforms.Compose([ transforms.Resize( 256 ), transforms.CenterCrop( 224 ), transforms.ToTensor(), transforms.Normalize( mean = [ 0.485 , 0.456 , 0.406 ], std = [ 0.229 , 0.224 , 0.225 ]) ])
On mobile devices, memory is limited. Use techniques such as releasing unused tensors and using in-place operations to reduce memory usage.
import torch x = torch.randn( 10 , 10 ) y = torch.randn( 10 , 10 ) # In - place addition x.add_(y)
Model Figures & Evaluation Curves (4 Images)
Deep Learning Execution Pipeline
(Preprocessing)
(Feature Extraction)
(Self-Attention)
(Loss Optimization)