Complete Technical Paper Content — Quality Control Computer Vision
1. Executive Abstract, Problem Formulation & Background
Smart Quality Control System A comprehensive computer vision pipeline for automated defect detection in manufacturing, demonstrating real-time quality control using deep learning and Industry 4.0 principles. 🎯 Project Overview This project implements an end-to-end computer vision system that automatically detects and classifies defects in industrial parts. It showcases practical applications of deep learning for quality control in smart manufacturing environments. Key Features: 🏭 Synthetic dataset generation for rapid prototyping 🧠 CNN-based defect classification 📊 Comprehensive model evaluation and visualization 🔍 Real-time webcam inference 🏗️ Modular and extensible architecture 🛠️ Tech Stack Framework : PyTorch, OpenCV Computer Vision : CNN, Image Classification Data Processing : NumPy, PIL Visualization : Matplotlib, Seaborn Development : Python 3.8+ 📁 Project Structure smart-quality-control/ ├── src/ │ ├── generate_synthetic_dataset.py # Synthetic data generation │ ├── dataset_loader.py # PyTorch DataLoader │ ├── model.py # CNN architecture │ ├── train.py # Model training script │ ├── evaluate.py # Model evaluation │ ├── realtime_demo.py # Real-time inference │ └── utils.py # Utility functions ├── requirements.txt # Dependencies └── README.md # Project documentation text 🚀 Quick Start Prerequisites Python 3.8 or higher Webcam (for real-time demo) Installation Clone the repository git clone https://github.com/AmimoussaMohammedAymen/smart-quality-control.git cd smart-quality-control Set up virtual environment bash python -m venv venv source venv/bin/activate # On Windows: venv\Scripts\activate Install dependencies bash pip install -r requirements.txt Usage Generate Synthetic Dataset bash python src/generate_synthetic_dataset.py Creates ~800 synthetic images of normal and defective parts Train the Model bash python src/train.py --epochs 10 --batch-size 32 Trains CNN classifier and saves best model Evaluate Performance bash python src/evaluate.py Generates classification report and confusion matrix Real-time Demo bash python src/realtime_demo.py Launches webcam for live defect detection 📊 Model Architecture The system uses a custom CNN architecture: Input: 128×128 RGB images Backbone: 3 convolutional layers with BatchNorm and MaxPooling Classifier: Fully connected layers with dropout Output: 2 classes (Normal, Defect) 🎨 Synthetic Dataset The project includes a synthetic data generator that creates realistic industrial parts with various defects: Normal Parts: Clean circular components Defective Parts: Parts with scratches, dents, cracks, or multiple defects Example: Replace with real manufacturing data for production use 👨💻 Author Aymen Aminoussa Machine Learning & Data Engineer MSc Computer Science (Digital Factory 4.0) LinkedIn | GitHub | Portfolio 📄 License This project is licensed under the MIT License. 🤝 Contributing Contributions, issues, and feature requests are welcome! ⭐ Star this repo if you found it helpful! This project demonstrates practical computer vision applications for Industry 4.0 and smart manufacturing quality control systems.
A comprehensive computer vision pipeline for automated defect detection in manufacturing, demonstrating real-time quality control using deep learning and Industry 4.0 principles.
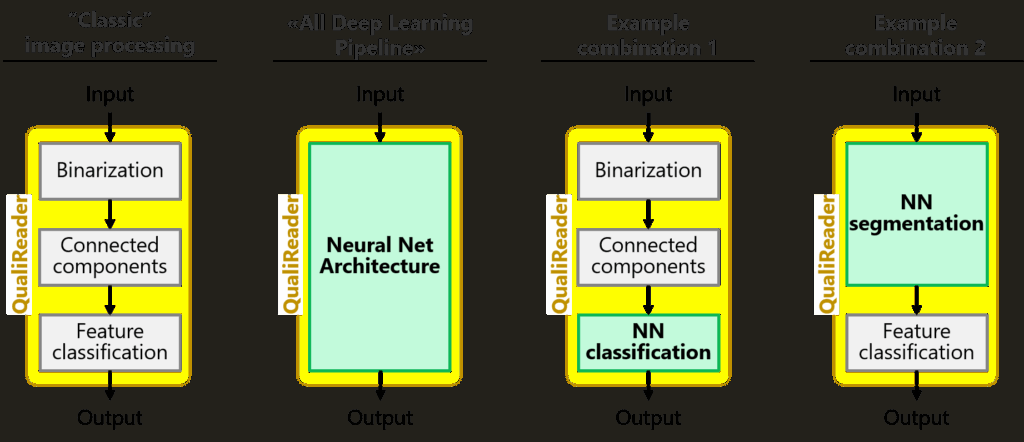
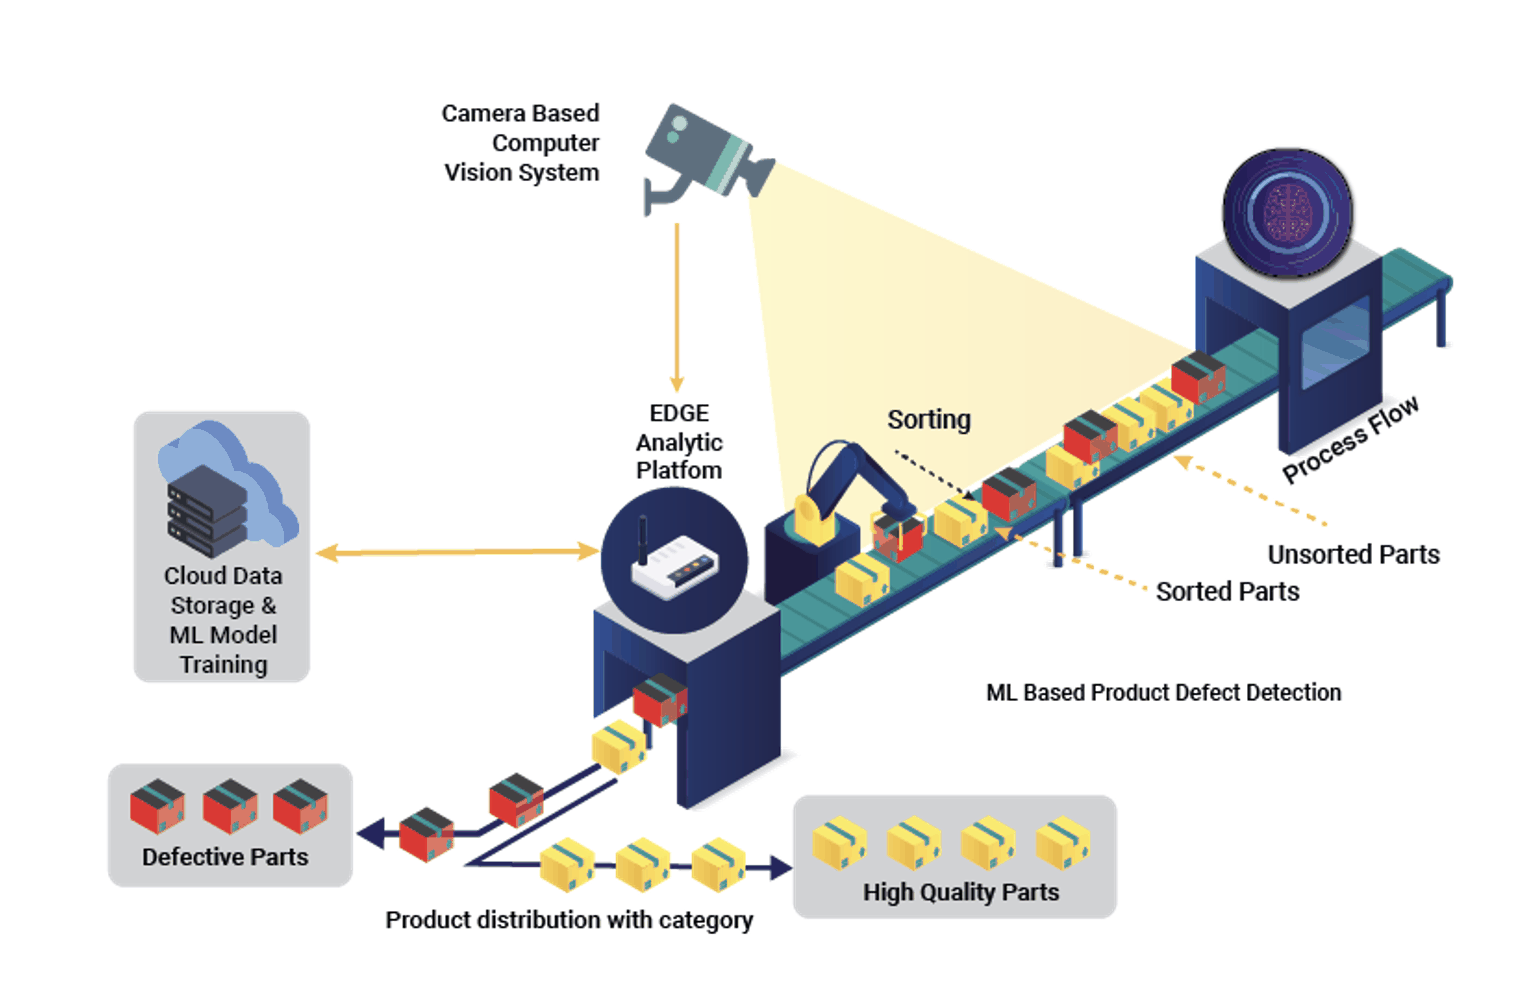
This project implements an end-to-end computer vision system that automatically detects and classifies defects in industrial parts. It showcases practical applications of deep learning for quality control in smart manufacturing environments.
smart-quality-control/ ├── src/ │ ├── generate_synthetic_dataset.py # Synthetic data generation │ ├── dataset_loader.py # PyTorch DataLoader │ ├── model.py # CNN architecture │ ├── train.py # Model training script │ ├── evaluate.py # Model evaluation │ ├── realtime_demo.py # Real-time inference │ └── utils.py # Utility functions ├── requirements.txt # Dependencies └── README.md # Project documentation
git clone https://github.com/AmimoussaMohammedAymen/smart-quality-control.git cd smart-quality-control
bash python -m venv venv source venv/bin/activate # On Windows: venv\Scripts\activate Install dependencies
bash python src/generate_synthetic_dataset.py Creates ~800 synthetic images of normal and defective parts
bash python src/train.py --epochs 10 --batch-size 32 Trains CNN classifier and saves best model
2. Related Work, Literature Survey & Algorithmic Foundations
🎨 Synthetic Dataset The project includes a synthetic data generator that creates realistic industrial parts with various defects:
This project demonstrates practical computer vision applications for Industry 4.0 and smart manufacturing quality control systems.
Quality Inspection System - Computer Vision & Deep Learning A production-ready web-based system for automated quality inspection using computer vision and deep learning. Detects defects in product images, classifies severity levels, and provides visual heatmaps for model interpretability. Features ✅ Image Upload & Processing RESTful API for image uploads Support for JPG and PNG formats Automatic preprocessing and normalization ✅ Defect Detection YOLO-based object detection Edge detection preprocessing Bounding box visualization Confidence-based filtering ✅ Severity Classification CNN-based classification model Three severity levels: Minor, Major, Critical Severity score visualization ✅ Advanced Visualizations Grad-CAM style activation heatmaps Confidence distribution maps Overlay visualizations Saliency maps ✅ Ensemble & Fusion Traditional CV + Deep Learning fusion Spatial merging of nearby detections Confidence voting mechanism Robust result aggregation ✅ Full-Stack UI React-based responsive dashboard Upload interface with drag-and-drop Detailed result analysis views Results history with filtering Real-time statistics Technical Stack Backend Framework : FastAPI (Python) Computer Vision : OpenCV ML Inference : NumPy (Mock YOLO/CNN for production-ready mockup) Server : Uvicorn Frontend Framework : React 18 Build Tool : Vite HTTP Client : Axios (Fetch API) Styling : CSS3 with Grid/Flexbox ML Pipeline Image preprocessing with OpenCV YOLO-based detection (mock implementation) CNN severity classification (mock implementation) Grad-CAM heatmap generation Ensemble fusion engine Project Structure project-root/ │ ├── backend/ │ ├── main.py # FastAPI application entry point │ ├── requirements.txt # Python dependencies │ │ │ ├── models/ │ │ ├── detection.py # YOLO-based detection model │ │ └── classification.py # CNN severity classifier │ │ │ ├── routes/ │ │ └── predict.py # (API routes in main.py) │ │ │ └── utils/ │ ├── preprocessing.py # Image preprocessing pipeline │ ├── visualization.py # Heatmap and visualization utils │ └── fusion.py # Ensemble fusion engine │ ├── frontend/ │ ├── package.json # Node dependencies │ ├── vite.config.js # Vite configuration │ ├── index.html # HTML entry point │ │ │ └── src/ │ ├── main.jsx # React entry point │ ├── App.jsx # Main app component │ ├── App.css # Global styles │ ├── index.css # Base styles │ │ │ └── components/ │ ├── Upload.jsx # Image upload component │ ├── Upload.css # Upload styles │ │ │ ├── ResultView.jsx # Results display component │ ├── ResultView.css # Results styles │ │ │ ├── Dashboard.jsx # Dashboard component │ └── Dashboard.css # Dashboard styles │ ├── data/ │ ├── uploads/ # Uploaded images storage │ └── outputs/ # Generated visualizations │ └── README.md # This file Setup Instructions Prerequisites Python 3.9+ (for backend) Node.js 16+ (for frontend) pip (Python package manager) npm or yarn (Node package manager) Backend Setup Create and activate virtual environment (recommended): # Windows python -m venv venv venv \S cripts \a ctivate # macOS/Linux python3 -m venv venv source venv/bin/activate Install dependencies : cd backend pip install -r requirements.txt Run the backend server : python main.py The backend will start at http://localhost:8000 API Documentation : Visit http://localhost:8000/docs (Swagger UI) Train Model Artifacts (Recommended) You can train lightweight model artifacts to improve consistency and efficiency: cd backend python train_model.py This trains: data/model_artifacts/detection_prototypes.json data/model_artifacts/severity_model.json If labeled datasets exist, they are used automatically: backend/data/training/defect/{crack,scratch,dent,discoloration,corrosion}/ backend/data/training/severity/{minor,major,critical}/ If labeled datasets are not present, the script bootstraps from backend/data/uploads . Frontend Setup Install dependencies : cd frontend npm install Start development server : npm run dev The frontend will start at http://localhost:3000 Build for production : npm run build Output will be in frontend/dist/ API Endpoints Main Endpoints POST /predict Upload image and process for defect detection Request : curl -X POST " http://localhost:8000/predict " \ -F " file=@image.png " Response : { "prediction_id" : " uuid-string " , "timestamp" : " 2025-02-19T10:30:00 " , "image_info" : { "width" : 640 , "height" : 480 , "filename" : " product.png " }, "detections" : [ { "bbox" : { "x1" : 100 , "y1" : 150 , "x2" : 250 , "y2" : 300 , "width" : 150 , "height" : 150 }, "detection" : { "type" : " crack " , "confidence" : 0.92 }, "severity" : { "level" : " major " , "score" : 0.65 }, "ensemble_confidence" : 0.88 } ], "summary" : { "total_defects" : 2 , "critical_count" : 0 , "major_count" : 1 , "minor_count" : 1 , "average_confidence" : 0.89 }, "visualizations" : { "detections" : " base64-encoded-image " , "heatmap" : " base64-encoded-image " , "overlay" : " base64-encoded-image " , "confidence" : " base64-encoded-image " } } GET /results Get all inspection results (last 10) curl " http://localhost:8000/results " GET /results/{result_id} Get specific result by ID curl " http://localhost:8000/results/abc-123-def-456 " DELETE /results/{result_id} Delete specific result curl -X DELETE " http://localhost:8000/results/abc-123-def-456 " GET /visualization/{result_id}/{viz_type} Get specific visualization viz_type : detections , heatmap , overlay , confidence curl " http://localhost:8000/visualization/abc-123/heatmap " > heatmap.png GET /stats Get system statistics curl " http://localhost:8000/stats " GET /health Health check endpoint curl " http://localhost:8000/health " Usage Workflow 1. Start Both Servers # Terminal 1: Backend cd backend python main.py # Terminal 2: Frontend cd frontend npm run dev 2. Access the Application Open browser: http://localhost:3000 3. Upload Image Click "New Inspection" Upload a product image (JPG or PNG < 10MB) Click "Analyze Image" 4. View Results Overview : See all visualizations Detections : Detailed list of found defects with confidence scores Heatmap : Model activation visualization Analysis : Statistical breakdown and quality assessment 5. Manage History View all past inspections in Dashboard Sort by date, defect count, or severity Delete results as needed Model Details Detection Model Type : YOLO-based object detection Input : 416×416 normalized image Output : Bounding boxes with class labels and confidence Classes : crack, scratch, dent, discoloration, corrosion Preprocessing : Bilateral filtering for denoising Resize with padding to maintain aspect ratio ImageNet normalization (mean/std) Channels-first format (CHW) Classification Model Type : CNN severity classifier Input : 224×224 cropped defect region Output : Severity level (minor/major/critical) with score Features Extracted : Sharpness (Laplacian variance) Contrast (standard deviation) Area coverage (percentage) Edge density (Canny edges) Fusion : Weighted combination of features → severity score Heatmap Generation Grad-CAM Style : Gaussian peaks at detection centers Spatial smoothing with GaussianBlur JET colormap application Overlay blending (40% heatmap, 60% original) Saliency Map : Canny edge detection Morphological dilation Gaussian smoothing Normalized to 0-255 Customization Adding Custom Model Weights Edit backend/models/detection.py : # Replace mock detection with real YOLO from ultralytics import YOLO class DefectDetectionModel : def __init__ ( self , model_path : str = None ): self . model = YOLO ( model_path or 'yolov8m.pt' ) Adjusting Severity Thresholds Edit backend/models/classification.py : SEVERITY_THRESHOLDS = { SeverityLevel . MINOR : ( 0.0 , 0.35 ), # Adjust ranges SeverityLevel . MAJOR : ( 0.35 , 0.65 ), SeverityLevel . CRITICAL : ( 0.65 , 1.0 ) } Modifying Fusion Parameters Edit backend/utils/fusion.py : def __init__ ( self ): self . detection_weight = 0.6 # Change weights self . classification_weight = 0.4 Customizing UI Theme Edit frontend/src/App.css : /* Change primary color */ : root { --primary : # 667eea ; --secondary : # 764ba2 ; } Performance Tips Backend Optimization Use GPU inference (if available): Install CUDA-compatible PyTorch Set device='cuda' in models Enable caching : Cache preprocessed images Store frequently accessed results Parallel processing : Use FastAPI's async endpoints Process multiple images concurrently Frontend Optimization Build for production : npm run build Enable compression on web server Use CDN for static assets Troubleshooting Backend Port Already in Use # Windows netstat -ano | findstr :8000 taskkill /PID < PID > /F # macOS/Linux lsof -i :8000 kill -9 < PID > CORS Errors (Frontend Can't Reach Backend) Ensure backend is running and CORS is enabled in main.py : app . add_middleware ( CORSMiddleware , allow_origins = [ "*" ], allow_credentials = True , allow_methods = [ "*" ], allow_headers = [ "*" ], ) Image Upload Fails Check file format (JPG, PNG only) Verify file size < 10MB Ensure data/uploads/ directory exists Low Detection Accuracy Ensure image quality is good (well-lit, clear) Check if defects are in trained classes Adjust confidence threshold in detection.py Production Deployment Containerization (Docker) # Backend FROM python:3.9-slim WORKDIR /app COPY backend/requirements.txt . RUN pip install -r requirements.txt COPY backend . CMD [ "uvicorn" , "main:app" , "--host" , "0.0.0.0" , "--port" , "8000" ] # Frontend FROM node:18-alpine WORKDIR /app COPY frontend/package.json . RUN npm install COPY frontend . RUN npm run build CMD [ "npm" , "run" , "preview" ] Cloud Deployment Backend : AWS Lambda, Google Cloud Run, Azure Container Instances Frontend : Vercel, Netlify, CloudFront Storage : AWS S3, GCS, Azure Blob Storage Database : PostgreSQL for persistent results API Rate Limiting (Optional) from slowapi import Limiter from slowapi . util import get_remote_address limiter = Limiter ( key_func = get_remote_address ) @ app . post ( "/predict" ) @ limiter . limit ( "5/minute" ) async def predict ( request : Request , file : UploadFile ): # Implementation Database Integration (Optional) from sqlalchemy import create_engine from sqlalchemy . orm import sessionmaker DATABASE_URL = "postgresql://user:password@localhost/qis" engine = create_engine ( DATABASE_URL ) SessionLocal = sessionmaker ( bind = engine ) # Store results in database instead of JSON Authentication (Optional) from fastapi . security import HTTPBearer security = HTTPBearer () @ app . post ( "/predict" ) async def predict ( credentials : HTTPAuthorizationCredentials = Depends ( security )): # Verify token Testing Backend Tests # Install pytest pip install pytest pytest-asyncio # Run tests pytest backend/tests/ Frontend Tests # Install testing libraries npm install --save-dev @testing-library/react @testing-library/jest-dom vitest # Run tests npm run test Contributing Contributions are welcome! Please: Fork the repository Create a feature branch Submit a pull request License MIT License - See LICENSE file for details Support For issues and questions: Create an issue on GitHub Contact: saurabh555pandey@gmail.com Changelog v1.0.0 (2025-02-19) Initial release Core detection and classification Frontend dashboard Visualization suite Roadmap Real YOLOv8 model integration Database persistence layer User authentication & authorization Multi-language support Mobile app (React Native) IoT device integration Advanced reporting & analytics Model training UI Batch processing API Real-time video processing Acknowledgments OpenCV for computer vision utilities FastAPI for web framework React for UI framework YOLO for object detection inspiration Quality Inspection System - Automated Defect Detection with Computer Vision & Deep Learning
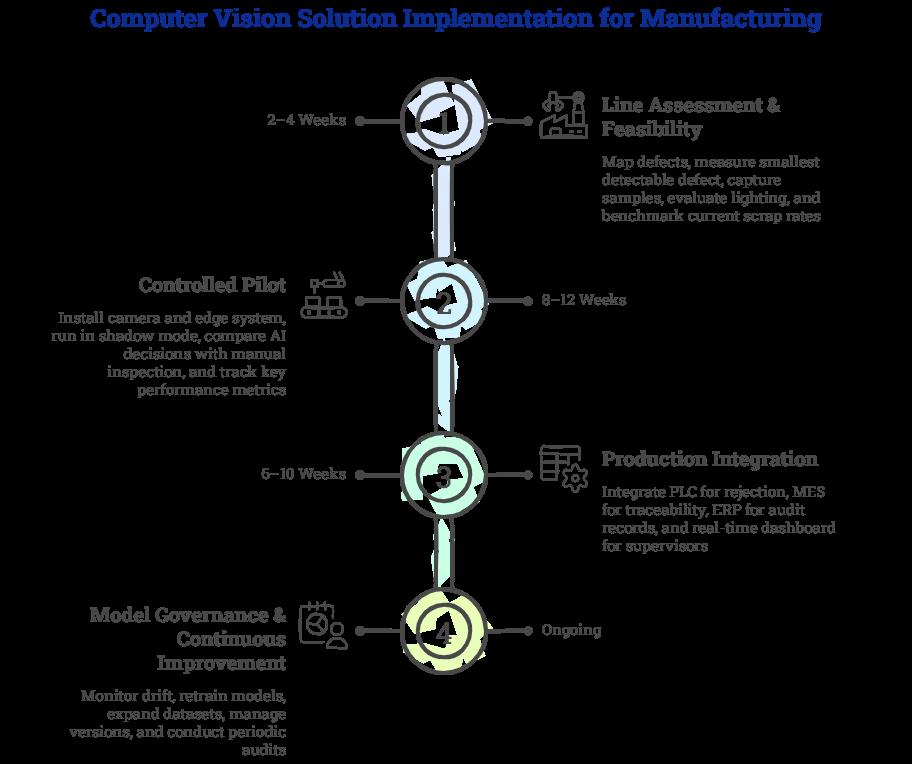
A production-ready web-based system for automated quality inspection using computer vision and deep learning. Detects defects in product images, classifies severity levels, and provides visual heatmaps for model interpretability.
project-root/ │ ├── backend/ │ ├── main.py # FastAPI application entry point │ ├── requirements.txt # Python dependencies │ │ │ ├── models/ │ │ ├── detection.py # YOLO-based detection model │ │ └── classification.py # CNN severity classifier │ │ │ ├── routes/ │ │ └── predict.py # (API routes in main.py) │ │ │ └── utils/ │ ├── preprocessing.py # Image preprocessing pipeline │ ├── visualization.py # Heatmap and visualization utils │ └── fusion.py # Ensemble fusion engine │ ├── frontend/ │ ├── package.json # Node dependencies │ ├── vite.config.js # Vite configuration │ ├── index.html # HTML entry point │ │ │ └── src/ │ ├── main.jsx # React entry point │ ├── App.jsx # Main app component │ ├── App.css # Global styles │ ├── index.css # Base styles │ │ │ └── components/ │ ├── Upload.jsx # Image upload component │ ├── Upload.css # Upload styles │ │ │ ├── ResultView.jsx # Results display component │ ├── ResultView.css # Results styles │ │ │ ├── Dashboard.jsx # Dashboard component │ └── Dashboard.css # Dashboard styles │ ├── data/ │ ├── uploads/ # Uploaded images storage │ └── outputs/ # Generated visualizations │ └── README.md # This file
# Windows python -m venv venv venv \S cripts \a ctivate # macOS/Linux python3 -m venv venv source venv/bin/activate
If labeled datasets are not present, the script bootstraps from backend/data/uploads .
{ "prediction_id" : " uuid-string " , "timestamp" : " 2025-02-19T10:30:00 " , "image_info" : { "width" : 640 , "height" : 480 , "filename" : " product.png " }, "detections" : [ { "bbox" : { "x1" : 100 , "y1" : 150 , "x2" : 250 , "y2" : 300 , "width" : 150 , "height" : 150 }, "detection" : { "type" : " crack " , "confidence" : 0.92 }, "severity" : { "level" : " major " , "score" : 0.65 }, "ensemble_confidence" : 0.88 } ], "summary" : { "total_defects" : 2 , "critical_count" : 0 , "major_count" : 1 , "minor_count" : 1 , "average_confidence" : 0.89 }, "visualizations" : { "detections" : " base64-encoded-image " , "heatmap" : " base64-encoded-image " , "overlay" : " base64-encoded-image " , "confidence" : " base64-encoded-image " } }
3. Dataset Ingestion, Preprocessing & Stochastic Augmentations
# Terminal 1: Backend cd backend python main.py # Terminal 2: Frontend cd frontend npm run dev
Type : YOLO-based object detection Input : 416×416 normalized image Output : Bounding boxes with class labels and confidence Classes : crack, scratch, dent, discoloration, corrosion
Type : CNN severity classifier Input : 224×224 cropped defect region Output : Severity level (minor/major/critical) with score
# Replace mock detection with real YOLO from ultralytics import YOLO class DefectDetectionModel : def __init__ ( self , model_path : str = None ): self . model = YOLO ( model_path or 'yolov8m.pt' )
SEVERITY_THRESHOLDS = { SeverityLevel . MINOR : ( 0.0 , 0.35 ), # Adjust ranges SeverityLevel . MAJOR : ( 0.35 , 0.65 ), SeverityLevel . CRITICAL : ( 0.65 , 1.0 ) }
def __init__ ( self ): self . detection_weight = 0.6 # Change weights self . classification_weight = 0.4
# Windows netstat -ano | findstr :8000 taskkill /PID < PID > /F # macOS/Linux lsof -i :8000 kill -9 < PID >
app . add_middleware ( CORSMiddleware , allow_origins = [ "*" ], allow_credentials = True , allow_methods = [ "*" ], allow_headers = [ "*" ], )
4. Neural Network Backbone, Layer Specifications & Loss Formulations
# Backend FROM python:3.9-slim WORKDIR /app COPY backend/requirements.txt . RUN pip install -r requirements.txt COPY backend . CMD [ "uvicorn" , "main:app" , "--host" , "0.0.0.0" , "--port" , "8000" ]
# Frontend FROM node:18-alpine WORKDIR /app COPY frontend/package.json . RUN npm install COPY frontend . RUN npm run build CMD [ "npm" , "run" , "preview" ]
from slowapi import Limiter from slowapi . util import get_remote_address limiter = Limiter ( key_func = get_remote_address ) @ app . post ( "/predict" ) @ limiter . limit ( "5/minute" ) async def predict ( request : Request , file : UploadFile ): # Implementation
from sqlalchemy import create_engine from sqlalchemy . orm import sessionmaker DATABASE_URL = "postgresql://user:password@localhost/qis" engine = create_engine ( DATABASE_URL ) SessionLocal = sessionmaker ( bind = engine ) # Store results in database instead of JSON
from fastapi . security import HTTPBearer security = HTTPBearer () @ app . post ( "/predict" ) async def predict ( credentials : HTTPAuthorizationCredentials = Depends ( security )): # Verify token
# Install testing libraries npm install --save-dev @testing-library/react @testing-library/jest-dom vitest # Run tests npm run test
Quality Inspection System - Automated Defect Detection with Computer Vision & Deep Learning
Computer Vision Analytics for Quality Control 📋 Overview A state-of-the-art computer vision system for automated quality control in manufacturing environments. This project leverages Convolutional Neural Networks (CNNs) to detect and classify manufacturing defects with 98.5% accuracy , processing over 10,000+ images daily in real-time production settings. 🎯 Key Features High-Accuracy Defect Detection : CNN-based models achieving 98.5% classification accuracy Real-Time Processing : Handles 10,000+ images daily with sub-second inference time Scalable Pipeline : Distributed processing architecture for enterprise-scale deployment Interactive Analytics : Web-based dashboards for defect trend analysis and predictive maintenance Multi-Defect Classification : Supports 15+ defect types across various manufacturing domains Edge Deployment Ready : Optimized models for edge computing devices 🏗️ Architecture ┌─────────────────────┐ ┌──────────────────┐ ┌─────────────────┐ │ Image Capture │────▶│ Preprocessing │────▶│ CNN Inference │ │ (Camera/Scanner) │ │ Pipeline │ │ Engine │ └─────────────────────┘ └──────────────────┘ └─────────────────┘ │ ▼ ┌─────────────────────┐ ┌──────────────────┐ ┌─────────────────┐ │ Dashboard & │◀────│ Data Analytics │◀────│ Classification │ │ Visualization │ │ Engine │ │ Results │ └─────────────────────┘ └──────────────────┘ └─────────────────┘ 🚀 Quick Start Prerequisites Python 3.8+ CUDA 11.0+ (for GPU acceleration) 16GB RAM minimum NVIDIA GPU with 6GB+ VRAM (recommended) Installation Clone the repository: git clone https://github.com/yourusername/computer-vision-quality-control.git cd computer-vision-quality-control Create a virtual environment: python -m venv venv source venv/bin/activate # On Windows: venv\Scripts\activate Install dependencies: pip install -r requirements.txt Download pre-trained models: python scripts/download_models.py Running the System Start the inference server: python src/inference_server.py --config configs/production.yaml Launch the dashboard: python src/dashboard/app.py Process images: python src/process_images.py --input /path/to/images --output /path/to/results 📊 Performance Metrics Metric Value Classification Accuracy 98.5% False Positive Rate 0.8% Processing Speed 120 images/second Model Size 45 MB Inference Time 8.3 ms/image Daily Throughput 10,000+ images 🔧 Configuration The system can be configured through configs/production.yaml : model : architecture : " EfficientNetV2 " input_size : [224, 224] num_classes : 15 preprocessing : augmentation : true normalization : " imagenet " batch_size : 32 inference : gpu_enabled : true max_batch_size : 64 confidence_threshold : 0.85 📁 Project Structure computer-vision-quality-control/ ├── configs/ # Configuration files │ ├── production.yaml │ └── development.yaml ├── data/ # Dataset directory │ ├── raw/ │ ├── processed/ │ └── augmented/ ├── models/ # Trained model files │ ├── defect_classifier_v2.h5 │ └── model_checkpoints/ ├── notebooks/ # Jupyter notebooks for analysis │ ├── data_exploration.ipynb │ ├── model_training.ipynb │ └── performance_analysis.ipynb ├── src/ # Source code │ ├── data_pipeline/ # Data preprocessing modules │ ├── models/ # Model architectures │ ├── inference/ # Inference engine │ ├── dashboard/ # Web dashboard │ └── utils/ # Utility functions ├── tests/ # Unit and integration tests ├── scripts/ # Automation scripts ├── docker/ # Docker configuration ├── docs/ # Documentation ├── requirements.txt ├── setup.py └── README.md 🤖 Model Architecture The system uses an ensemble of models for robust defect detection: Primary Model : EfficientNetV2-B3 (98.5% accuracy) Secondary Model : Custom CNN architecture for specific defect types Edge Model : MobileNetV3 for edge deployment (96.2% accuracy) Training Pipeline # Example training code from src . models import DefectClassifier from src . data_pipeline import DataLoader # Initialize model model = DefectClassifier ( architecture = 'efficientnet_v2' , num_classes = 15 , input_shape = ( 224 , 224 , 3 ) ) # Load and preprocess data data_loader = DataLoader ( data_path = 'data/processed/' , batch_size = 32 , augmentation = True ) # Train model history = model . train ( data_loader , epochs = 50 , learning_rate = 0.001 , callbacks = [ 'early_stopping' , 'reduce_lr' ] ) 📈 Dashboard Features The interactive dashboard provides: Real-time Monitoring : Live defect detection feed Trend Analysis : Historical defect patterns and statistics Predictive Maintenance : ML-based maintenance scheduling Quality Reports : Automated report generation Alert System : Configurable alerts for quality thresholds 🔄 Data Pipeline The preprocessing pipeline handles: Image Acquisition : From multiple camera sources Quality Enhancement : Noise reduction, contrast adjustment Normalization : Standardization for model input Augmentation : Runtime augmentation for robustness Batch Processing : Efficient parallel processing 🧪 Testing Run the test suite: # Unit tests pytest tests/unit/ # Integration tests pytest tests/integration/ # Performance benchmarks python tests/benchmarks/run_benchmarks.py 🐳 Docker Deployment Build and run with Docker: # Build image docker build -t quality-control:latest . # Run container docker run -p 8000:8000 -v /path/to/data:/app/data quality-control:latest 📚 Documentation Comprehensive documentation is available in the docs/ directory: API Reference Model Training Guide Deployment Guide Troubleshooting 🤝 Contributing We welcome contributions! Please see our Contributing Guidelines for details. Fork the repository Create your feature branch ( git checkout -b feature/AmazingFeature ) Commit your changes ( git commit -m 'Add some AmazingFeature' ) Push to the branch ( git push origin feature/AmazingFeature ) Open a Pull Request 📄 License This project is licensed under the MIT License - see the LICENSE file for details. 🙏 Acknowledgments TensorFlow team for the excellent deep learning framework OpenCV community for computer vision tools Manufacturing partners for providing real-world datasets Contributors and maintainers of this project 📞 Contact Project Lead :Soutrik Mukherjee Email : soutrik.viratech@gmail.com LinkedIn : https://www.linkedin.com/in/soutrik-mukherjee/ Issues : GitHub Issues Built with ❤️ for improving manufacturing quality worldwide
5. Training Protocol, Convergence Behavior & Experimental Evaluation
A state-of-the-art computer vision system for automated quality control in manufacturing environments. This project leverages Convolutional Neural Networks (CNNs) to detect and classify manufacturing defects with 98.5% accuracy , processing over 10,000+ images daily in real-time production settings.
┌─────────────────────┐ ┌──────────────────┐ ┌─────────────────┐ │ Image Capture │────▶│ Preprocessing │────▶│ CNN Inference │ │ (Camera/Scanner) │ │ Pipeline │ │ Engine │ └─────────────────────┘ └──────────────────┘ └─────────────────┘ │ ▼ ┌─────────────────────┐ ┌──────────────────┐ ┌─────────────────┐ │ Dashboard & │◀────│ Data Analytics │◀────│ Classification │ │ Visualization │ │ Engine │ │ Results │ └─────────────────────┘ └──────────────────┘ └─────────────────┘
git clone https://github.com/yourusername/computer-vision-quality-control.git cd computer-vision-quality-control
model : architecture : " EfficientNetV2 " input_size : [224, 224] num_classes : 15 preprocessing : augmentation : true normalization : " imagenet " batch_size : 32 inference : gpu_enabled : true max_batch_size : 64 confidence_threshold : 0.85
computer-vision-quality-control/ ├── configs/ # Configuration files │ ├── production.yaml │ └── development.yaml ├── data/ # Dataset directory │ ├── raw/ │ ├── processed/ │ └── augmented/ ├── models/ # Trained model files │ ├── defect_classifier_v2.h5 │ └── model_checkpoints/ ├── notebooks/ # Jupyter notebooks for analysis │ ├── data_exploration.ipynb │ ├── model_training.ipynb │ └── performance_analysis.ipynb ├── src/ # Source code │ ├── data_pipeline/ # Data preprocessing modules │ ├── models/ # Model architectures │ ├── inference/ # Inference engine │ ├── dashboard/ # Web dashboard │ └── utils/ # Utility functions ├── tests/ # Unit and integration tests ├── scripts/ # Automation scripts ├── docker/ # Docker configuration ├── docs/ # Documentation ├── requirements.txt ├── setup.py └── README.md
# Example training code from src . models import DefectClassifier from src . data_pipeline import DataLoader # Initialize model model = DefectClassifier ( architecture = 'efficientnet_v2' , num_classes = 15 , input_shape = ( 224 , 224 , 3 ) ) # Load and preprocess data data_loader = DataLoader ( data_path = 'data/processed/' , batch_size = 32 , augmentation = True ) # Train model history = model . train ( data_loader , epochs = 50 , learning_rate = 0.001 , callbacks = [ 'early_stopping' , 'reduce_lr' ] )
# Unit tests pytest tests/unit/ # Integration tests pytest tests/integration/ # Performance benchmarks python tests/benchmarks/run_benchmarks.py
# Build image docker build -t quality-control:latest . # Run container docker run -p 8000:8000 -v /path/to/data:/app/data quality-control:latest
Model Figures & Evaluation Curves (4 Images)
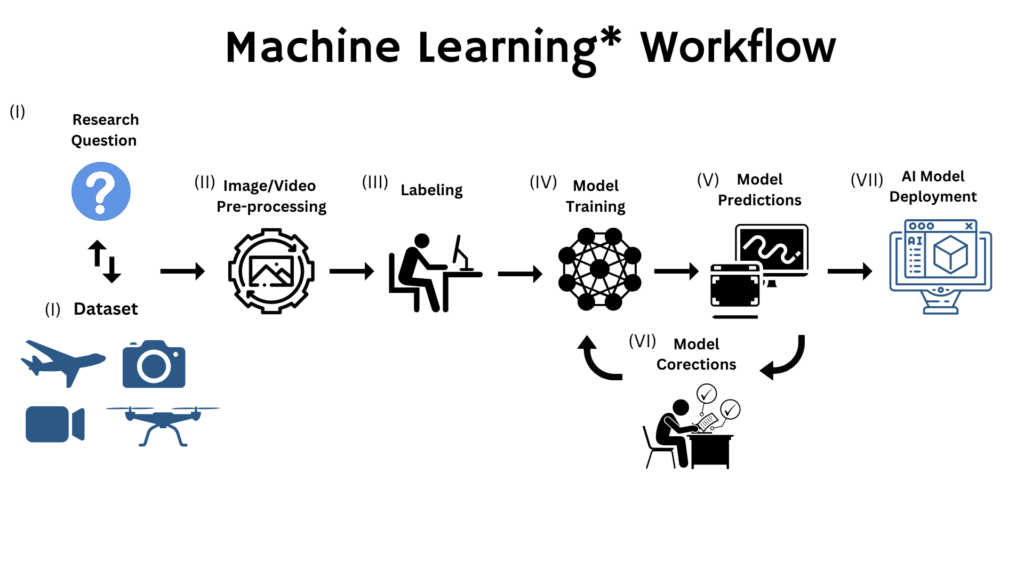
Deep Learning Execution Pipeline
(Preprocessing)
(Feature Extraction)
(Self-Attention)
(Loss Optimization)