Protection of Hardware: Powering Systems (Power Converter, Normal
Abstract
Along with the protection of magnets and power converters, we have added a section on personnel protection because this is our highest priority in the design and operation of power systems. Thus, our topics are the protection of people, power converters, and magnet loads (protected from the powering equipment), including normal conducting magnets and superconducting magnets.
Keywords
Magnets; superconducting; protection; quench; rectifier.
General Protection Techniques
In the protection of any of these topics, there are a number of general techniques that we use to help us achieve our protection goals. We will list them below and then point out when they are used in a variety of situations.
Redundancy
This means designing two independent paths leading to the desired protective action. For example, the overcurrent protection circuitry of a rectifier power converter might consist of a current transductor monitor circuit that turns off the thyristors in the power converter, as well as a shunt current monitor that opens the power-converter circuit breaker when the maximum current is exceeded.
A properly designed redundant protection system should have no elements that are common to both protective paths, since a failure of the common element might override both sources of protection.
Fail-Safe Design
This means that in the design of the protective circuitry, one should make sure that circuits are designed in such a way that any circuit failures that can be anticipated cause the system to turn OFF. The most common example of this is in the thermal protection of loads. We typically use a thermal switch that becomes an open circuit when the temperature is exceeded. The switch is connected to circuitry that turns off the power system when an open circuit is sensed. This avoids the anticipated problem of someone leaving the thermal switch disconnected from the system during installation or maintenance periods. If this does occur, the system cannot be turned on.
Response To Power Outages
As it is a virtual certainty that the a.c. power to the system will drop out during operation, it is important to design the electronics to respond in a safe and protective way to this situation. A common way to deal with this is to run the control system from the a.c. source of an uninterruptible power supply. This battery-backed system maintains control voltages intact until power elements can be safely de-activated.
Testing Protection Circuits
Well-designed protective circuits cannot be trusted until they are tested in place. This will involve opening doors to see that door-interlocks work, disconnecting or heating thermal switches, tripping the breaker supplying a.c. power to the system, etc. Redundant systems must be tested individually by bypassing each of the paths to see that the other path works.
Trouble-Shooting Aids
Usually when a power converter or magnet system trips off, this happens because an interlock has detected an improper situation and has acted correctly. Typically, it does not mean that the system is broken and in need of repair.
It is important to understand these trips and deal with potential problems before they lead to serious failures or endless annoyances. To this end, it is important to ensure that all trip indications latch and identify themselves. Beyond this, modern day transient recorders that can record the sequence of events leading to a trip are an invaluable tool, especially in complex systems.
Self-Contained Protection
This means that the power system’s internal controls must prevent incorrect commands from the accelerator control system from putting the power system in an unprotected state. For example, an operating current reference beyond the specified maximum current should be rejected or clamped.
Lock And Tag Out System
Our primary method of protecting people who will be working on a power system is our lock and tag out (LOTO) system. Before people are allowed to touch any element of the power system, they must first follow the LOTO procedure to turn the system off, lock out the sources of power, verify the absence of input power, discharge the energy stored in capacitor banks, and install ground clamps where necessary to ensure that nothing can become charged after the LOTO is completed. Installed locks are tagged with the name of the person who installed them and can only be removed by that person.
Interlocks
We use interlocks on power cabinet doors and in the accelerator tunnel to make sure that if someone unwittingly opens the door to a hazardous area, the power system will trip off. The main hazards will be removed from the equipment, but since the full LOTO has not been accomplished, the equipment will not yet be approved for access.
Captured Key Systems
In equipment with unusually high hazards, we often use a captured key system, which requires a person to lock off the source of power to the cabinet before gaining access to the key that will allow access to the cabinet. This does not take the place of the LOTO procedure; the LOTO procedure must be followed before one can work inside the system cabinet.
Protection Of Power Converters
The most common types of power converter used in magnet systems are the rectifier power converter and the switch-mode power converter. In this paper, we will focus on protecting the rectifier power converter.
Overcurrent Protection In A.C. Systems
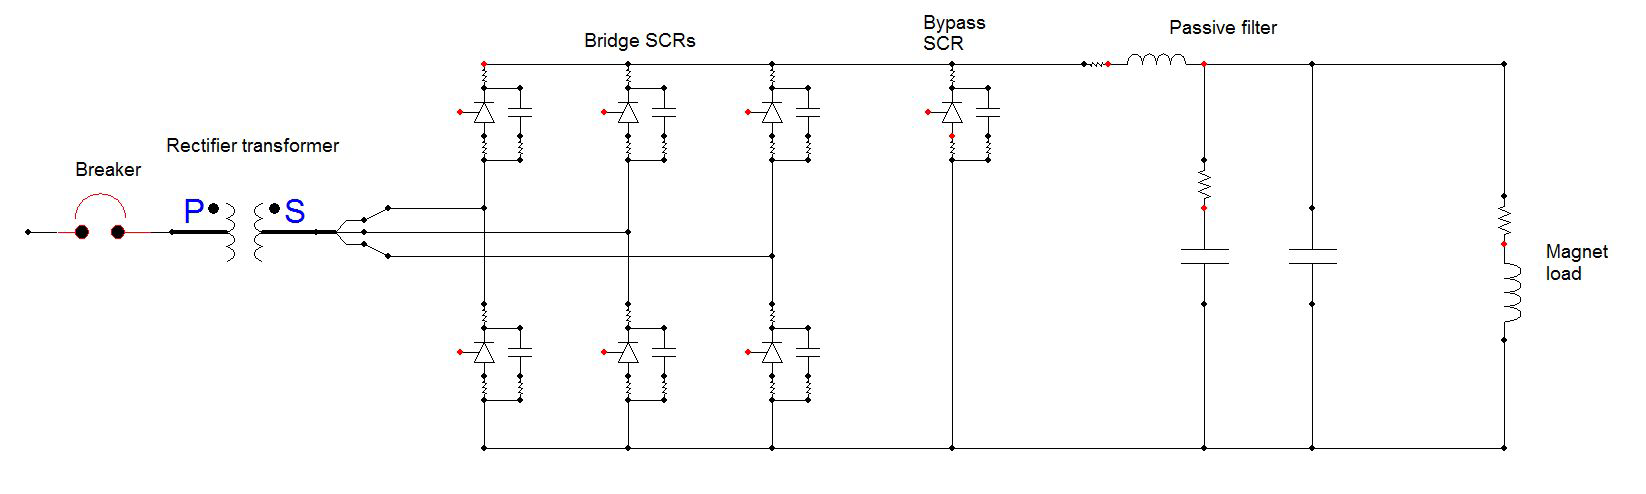
As in a small bench supply, a high-power rectifier power converter must be protected from the overcurrent that will occur following an internal short circuit. This protection is typically provided by a circuit breaker capable of interrupting the high fault current and disconnecting the power converter from the power line (see Fig. 1).
There are two levels of fault current that must be handled. If the fault occurs on the secondary of the rectifier transformer, the fault current on the primary is limited by the ‘impedance’ of the rectifier transformer (essentially its leakage inductance) and is typically 20 times the maximum operating current.
If the fault occurs on the primary side of the rectifier transformer, the current is limited by the ‘impedance’ of the transformer (typically at the power substation) powering the feeder system to which the power converter is attached. This fault current is usually much higher than the first case. The power- converter circuit breaker must be specified to interrupt this fault current in a system that is properly ‘coordinated’.
Overvoltage Protection In A.C. Systems
The rectifier transformer is typically protected by ‘surge suppressors’ located from the primary windings to ground, which limit the voltage if the feeder system is hit by lightning or if there is some other source of large transient voltages.
The transformer secondary is protected from transients that occur when the breaker opens under load by the use of RC (resistor–capacitor) snubber networks. The transformer and circuit breaker are specified and tested according to industrial standards to be able to withstand high transient voltages (e.g., 110 kV impulse testing on 15 kV rated equipment).
Protection In D.C. Systems
The most important elements to protect are the thyristors (silicon-controlled rectifiers). These devices must be chosen to have ample voltage (2.5 × operating voltage) and current ratings. Using the thyristor data sheets, we calculate the maximum temperature the thyristor junction will attain during the most severe operating mode. We select a device whose junction temperature we can keep below 80°C.
We also calculate the temperature variation of the junction in ramping systems and make sure that the temperature cycling is less than 30°C in systems whose cycle time is greater than 1 s. These two limits, which relate to the power-converter current, ensure a long lifetime for the thyristors.
The d.c. side of the power converter often has a passive filter to reduce ripple voltage on the rectifier output. We protect the filter choke, which is usually water-cooled in high current systems, with a thermal switch. The filter capacitors often have overpressure switches, which detect a failure and are used to interlock the power converter.
Response To Loss Of Power
We usually have an uninterruptible power supply to maintain the control voltages in the event of a power failure. This allows us time to bypass the current in the supply into the bypass thyristor (SCR) and then open the circuit breaker.
Overcurrent Protection
We normally use a direct current–current transformer (DCCT) to measure and regulate the load current coming out of the power converter. The same DCCT signal is compared with a trip threshold and bypasses the converter when the level is exceeded.
This protection is backed up with a shunt measurement that causes the circuit breaker to trip when the measured current exceeds the threshold, which is usually set slightly higher than the DCCT threshold.
For non-d.c. loads, it is sometimes necessary to design a circuit that trips the power converter based on the root mean square value of the current.
Voltage-To-Ground Protection
Magnets are manufactured with electrical conductors wound around an iron core, and isolated from the grounded core by a system of insulating material. The insulation system is designed to withstand up to a minimum voltage between the conductors and the core without breaking down.
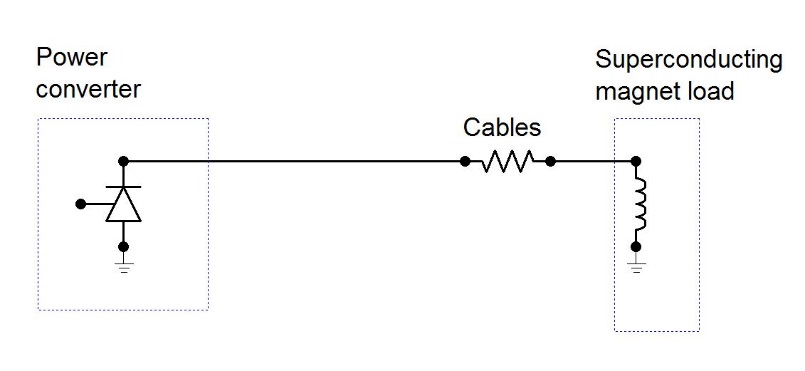
The design and validation of the magnet insulation system must be coordinated with the worst- case voltages that magnets will experience while operating in their circuit. The ‘ground fault circuit’ in a power converter has two functions: to detect unwanted current going to ground and to minimize the voltage-to-ground of the magnet load. We will consider the simple case of one power converter and one magnet as its load.
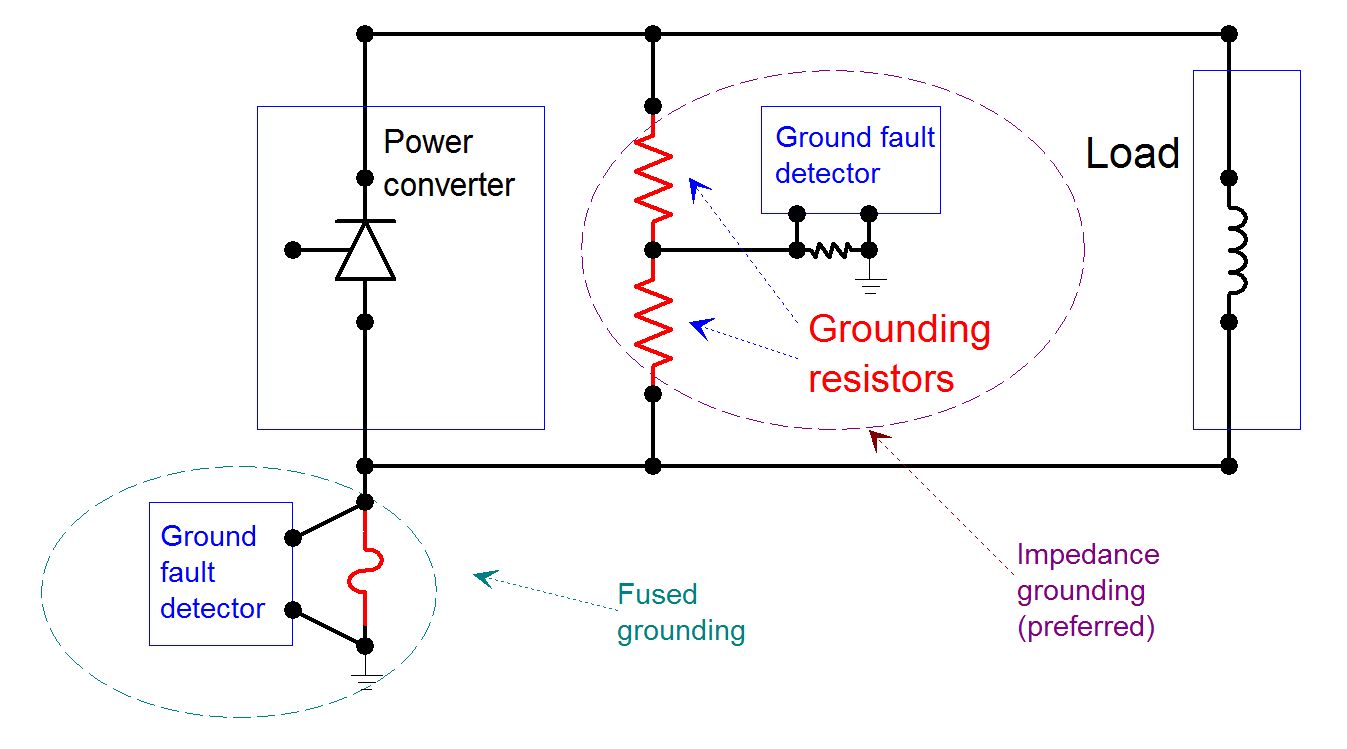
Figure 2 shows this simple case with two common forms of ground fault detector: the fused detector and the balanced high-impedance detector. In the former kind, the negative terminal of the power converter is held at ground with a low current fuse. If a short circuit to ground develops towards the positive terminal of the converter, it wants to pull the negative terminal below ground, but the fuse conducts to maintain the terminal at ground potential until there is sufficient current to blow the fuse. A circuit then detects that the fuse is blown and turns off the power converter.
Fig. 2: Grounding Schemes
This circuit has two drawbacks. If the power converter is a 1 kV unit, the part of the load connected to the positive terminal always sees the thousand volts to ground, stressing the magnet insulation at that level. Also, when a ground fault does develop, a high current may want to flow into the fuse and may exceed its interrupting rating. If this happens, this large current will flow through the faulted point for a long time and damage the point beyond recovery.
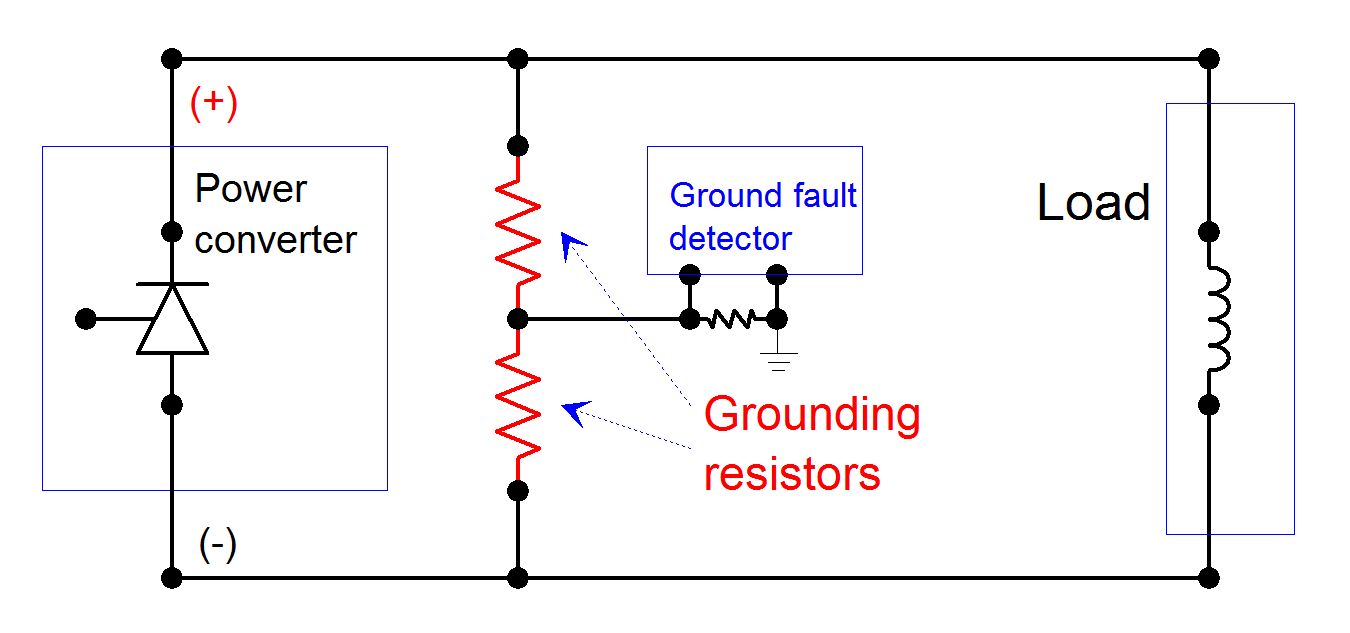
The balanced high-impedance grounding detector in Fig. 3 has grounding resistors of the order of a few kilo-ohms, so it cannot conduct high ground currents. This circuit also balances the voltage-to- ground, so that the maximum voltage that any part of the magnet sees in normal operation is ±500 V. If a ground fault develops in this system, the summing point between the two grounding resistors, which normally stays close to ground, is in deflected either a positive or negative direction, and this change in its voltage causes a trip of the power converter.
Fig. 3: Balanced High-Impedance Grounding
In this preferred scheme, although the maximum operating voltage-to-ground is half of the power- converter voltage, if a ground fault occurs near the negative terminal of the power converter, its positive terminal will be raised to the full voltage of the power converter before the ground fault circuit can react.
If a second ground fault occurs there, this is called a ‘double ground fault’. This is very much to be avoided because it allows large, destructive currents to go through both ground points. Thus, the magnet insulation in this example must be designed to withstand more than the full power-converter voltage (with some margin), so that a double ground fault is highly unlikely.
Protection Of Superconducting Magnets
Table 1 provides details for some example superconducting magnets. Circuits with superconducting magnets must have the same overcurrent and voltage-to-ground protection systems that are required for conventional magnet circuits. In addition, these circuits must have a quench protection system to protect the magnets when they lose their superconducting properties. We will start with some of the definitions and features of superconducting magnets.
–
Magnets are most commonly wound with superconducting cable (niobium–titanium).
–
Superconducting cable becomes superconducting (zero resistance) below a critical temperature (usually <10 K). Low temperatures are established and maintained in a bath of liquid helium that is cooled in a cryogenic refrigeration system.
–
Superconducting cable is made of several wire strands, each made of many superconducting filaments within a copper matrix.
–
The cable has a ‘short sample’ maximum current, beyond which it will ‘quench’ and lose its superconducting properties.
–
The copper matrix stabilizes the cable and provides an alternate current path for a short time when the superconductor ‘quenches’ or leaves its superconducting state.
–
A magnet wound with the wire has a lower maximum current because magnetic fields within the magnet decrease the cable’s maximum conduction.
–
A magnet’s maximum current can be increased by reducing its temperature. (Example: Fermilab’s Tevatron magnets went from 4000 A to 4400 A when the helium temperature was reduced by 0.75 °K at a cost of $6 million).
Table 1: Different accelerator magnets with their respective operating limits and the cross-sectional areas of their cables (the MIIT limit column is explained later in the text).
Quenching
A magnet conducting current in superconducting mode at cryogenic temperatures can suddenly lose its superconductive state, usually beginning at a particular spot in the magnet cable, when something causes the temperature at that spot to rise above the critical temperature.
Once the initiating spot quenches, the heat generated from the resistance typically keeps it in the quenched state, and the quenched area spreads to nearby areas at a speed known as the ‘quench velocity’.
Causes Of Quenching
There are several well-known causes of quenching in accelerator magnet systems.
Training
Training refers to the small slippage of one of the superconducting cables within the tightly clamped magnet structure. This slippage occurs when the magnet undergoes its initial powering. The slippage generates some heat, by friction, and the heat can cause a quench at that location. Usually, the cable slips into a more stable position and, once the magnet has undergone a few quenches as the current is increased to its maximum operating value, these quenches no longer occur; we say that the magnet has been ‘trained’.
Excess Di/Dt—Eddy Currents
Fast current changes can induce local eddy currents within the superconductor cable itself. These can cause local heating, leading to a quench of the cable. Sometimes, the action of rapidly decreasing the current in a magnet system to protect an element in the circuit can cause other elements to quench from excess dI/dt.
Particle Beam Heating
If the particle beam in a storage ring becomes unstable or the injection or extraction of the beam are not well controlled, part of the beam can hit the superconducting cable and cause a quench.
Cooling System Problems
If the helium warms to above the critical temperature, quenches will occur.
Exceeding The Short Sample Limit
Normally, the powering system is set up to protect against this happening, but sometimes the protection does not work correctly.
Spontaneous Quenches—Unknown Origins
Mystery quenches do happen in complex systems. This is why it is important to have good monitoring systems to provide the best chance of understanding each quench.
Heating Of The Initiating Spot—Miits
The initiating spot starts to heat first, and is normally the hottest place in the quenching magnet. Keeping its ultimate temperature below a damaging level (450 K) is critical in protecting the quenched magnet. A simplified way of thinking about the temperature rise at the initiating spot is to imagine it as a length of copper wire weighting M (g) with resistance R (Ω) and specific heat C (J/(g K)). Then the
𝑅𝑅
𝑀𝑀𝑀𝑀∫𝐼𝐼2 d𝑡𝑡 . Note that the temperature rise in this calculation is independent of the wire length. You can calculate an integral of I2 that will raise the temperature of the initiating spot from 10 K to 450 K. This integral is called the ‘MIIT’ limit of the cable. Usually this integral is in ‘millions of amp squared seconds’, hence the term ‘MIIT’.
This simplified example assumes constant values of R and C. In real life, the resistance of copper varies by about a factor of 100 between cryogenic and room temperatures and the specific heat varies by about a factor of 300. The calculation of realistic MIITs is not so different from the ideal because both R and C increase with increasing temperatures, and thus tend to compensate each other.
The MIITs calculation is crucial for determining the two primary factors of the quench protection
–
How quickly the current in the magnet must be reduced once the quench is detected;
–
How quickly a quenched must be detected once the initiating spot quenches. The allowable MIIT (see Table 2) in a magnet and the maximum operating current in its circuit set a maximum time-scale for the reduction of the current once a quench has been detected. Some examples of this relationship follow.
Table 2: MIIT limits and operating currents for three accelerator circuits: kIIT, ‘thousands of amp squared seconds’; MIIT, ‘millions of amp squared seconds’.
0.05
The time-scales for the reduction of the currents in these circuits are:
–
For a Tevatron dipole running at 4 kA (16 MIIT/s), the current in the quenching magnet must be substantially reduced within 0.44 s (7 MIIT ÷ 16 MIIT/s).
–
For an LHC dipole running at 12 kA (144 MIIT/s), the current in the quenching magnet must be substantially reduced within 0.22 s (32 ÷ 144).
–
For a Tevatron correction element running at 50 A (2.5 kIIT/s), the current in the quenching magnet must be substantially reduced within 1.28 s (3.2 ÷ 2.5).
6.2.1
Methods to reduce number of MIITs following quench detection in magnet circuits
–
Reduce power-converter voltage to zero if cable resistance is enough to limit the MIITs (example: Tevatron extraction quadrupole loops).
–
Reduce power-converter voltage and use energy extraction circuit to insert a resistance sufficient to limit the MIITs (example: Tevatron main quadrupole correction loop).
–
Reduce power-converter voltage and fire ‘Heaters’ (example: Tevatron low-beta magnets).
Method A
Reduce power-converter voltage to zero if cable resistance is sufficient to limit the number of MIITs (e.g., Tevatron extraction quadrupole loops). See Fig. 4.
Iit = ½ × 50 × 50 × 0.75 S = 0.94 Kiit,
which compares well with the 3.2 kIIT limit. Fig. 4: Limiting MIITs after quench detection, method a
Method B
Reduce voltage and use energy extraction circuit (insert a resistance, as in the Tevatron main quadrupole correction coil loops). See Fig. 5.
Imax = 50 A
IIT = ½ × 50 × 50 × 7.14 s = 8.9 kIIT without dump R , IIT = ½ × 50 × 50 × 1.6 s = 2.0 kIIT with dump R. The result with the dump resistance compares well with the 3.2 kIIT limit.
Deployment In Out-Of-Position Situations
D. Bendjaballah1, A. Bouchoucha1, M. L. Sahli1,2* and J-C. Gelin2
Abstract
Side-impact collisions represent the second greatest cause of fatality in motor vehicle accidents. Side-impact airbags have been installed in recent model year vehicle due to its effectiveness in reducing passengers’ injuries and fatality rates. In meeting these requirements, simulations of folding and deploying airbags are very useful and are widely used. The paper presents a simulation method for the deploying airbags using three materials in different working conditions. Finite element analysis is primarily used to evaluate this concept. In these simulations, the gas flow is described by the conservation laws of mass, momentum, and energy. The numerical results indicate that the FE method in this paper is capable of capturing airbag deploying process accurately.

Keywords: Airbag simulations, Out-of-position, Crash, Modeling, Out-of-position
Background
The passive safety of cars has become a very high prior- ity issue for the automotive industry. Today, there are not only one or two airbags in a car; certain models have ten times more than that. With the increasing usage of airbags, the number of accidents where the airbag itself can cause an injury to the occupant also increases
(Augenstein Et Al. 2003; Gabauer And Gabler 2010;
Audrey et al. 2011). As is well known, safety belts are also now devices designed to provide protection to the users of vehicles during crash events, minimizing the loads necessary to adapt their movement to the move- ment of the car (Freesmeier and Butler 1999; Schmitt et al. 1997). In general, the seat belt is designed to restrain the occupant in the vehicle and prevent the
Occupant From Having Harsh Contacts With Interior
surfaces of the vehicles. The airbag acts to cushion any impact with vehicle structure and has positive internal pressure, which can exert distributed restraining forces over the head and face. As a safety component of auto- mobile, an airbag decreases occupants’ injury likelihood effectively in case of an accident (Ruff et al. 2007). These safety elements can reduce the death rates on the roads, and its protection effects have been widely approved (Crandall et al. 2001; Teru and Ishikawa 2003). With computational tools such as finite element methods designed for dynamic contact problems, crashworthiness simulations can now be used with reliable accuracy to evaluate occupant protection in various collision condi- tions with safety metric/parameters such as acceleration, head injury criteria, intrusion distance, intrusion vel- ocity, and neck forces (neck injury risk or whiplash).
Thus, new types of airbag products are being developed to handle different collision scenarios.
Become Standard Equipment On Most New Passenger
vehicles (Braver and Kyrychenko 2004; Teng et al. 2007; Yoganandan et al. 2007). The airbag cushion is com- posed of a woven fabric which is rapidly inflated during a car crash. The airbag dissipates the passenger’s kinetic energy thereby reducing injury through biaxial stretching of the fabric bag and escaping gas through vents. There- fore, the performance of the airbag is greatly influenced by the mechanical properties of the fabric. Generally, air bags are designed to deploy in a crash that is equivalent to a vehicle crashing into a solid wall at 8 to 14 mph.

Air bags most often deploy when a vehicle collides with another vehicle or with a solid object like a tree. There are various types of airbags: frontal, side-impact, and curtain airbags. In general, the passenger side airbags are usually larger than the driver airbags (see Fig. 1).
Besançon, France
© The Author(s). 2017 Open Access This article is distributed under the terms of the Creative Commons Attribution 4.0 International License (http://creativecommons.org/licenses/by/4.0/), which permits unrestricted use, distribution, and reproduction in any medium, provided you give appropriate credit to the original author(s) and the source, provide a link to the Creative Commons license, and indicate if changes were made.

Bendjaballah et al. International Journal of Mechanical
Doi 10.1186/S40712-016-0070-2
Extensive studies have shown that the airbag deploy- ment in load cases consists of two occupant loading phases: a punch-out effect where the airbag bursts out of its container with the airbag and airbag module cover accelerating towards the occupant and a second loading phase during which the airbag is taking on its deployed shape and volume (membrane-loading effect). Bankdak et al. (2002) developed an experimental airbag test system to study airbag-occupant interactions during close proximity deployment. The results provided insight for simulating the effect of inflation energy and mass flow on target response. Bedard et al. (2002) found that while left-side (driver-side) impacts accounted for only 13.5% of all crashes, the fatality rate among these
Crashes Was 68.3% In Comparison To Front Impact
(48.3%), right-side impact (31.3%), and rear impact (38.4%). These studies underscore the importance of oc- cupant safety during side-impact collisions. In the last years, the current market requested to reduce the time and cost airbag development. In order to achieve this result, virtual simulations play an important role since they allow to minimize the number of experimental tests (Pei et al. 2013; Cao et al. 2014). Several simulation models of airbag were established (Wang et al. 2007). It is feasible to optimize the parameters of airbag deploy- ment using simulation technology. Experimental and numerical studies have quantified injury risks to close- proximity occupants from deploying side airbags. These studies have focused on the prevention of the most ad- verse effects of airbag deployment (Duma et al. 2003).
Other studies have proposed airbag characteristics to minimize particular biomechanical responses (Haland and Pipkorn 1996). In a more recent study, Marklund and Nilsson (2003) compared deformation patterns with experimental data as well as the computational costs associated with three different airbag deployment simu- lation methods; they concluded that the SPH method is relatively inexpensive and produces incremental deform- ation patterns that compare most closely to the experi- mental results. The process of inflation of an airbag is one of the determining factors in saving lives. The duration from the initial impact of the crash to the full inflation of an airbag is about 40 ms, and during this time, the airbag goes from being in a folded state to a fully inflated state, with a high internal pressure. After achieving this state, the airbag begins to deflate, thus providing a nice cushion for the body impacting it.
Ideally, the person in the crash should come into contact with the airbag at this time. In the present study, a large volume passenger side airbag model is developed to handle different collision scenarios. The main aim is evaluate the performance of deploying of passenger side airbag using finite element methods (FEM).
Materials
The tensile specimens were made in different airbags (P: Peugeot, R: Renault, and VW: Volkswagen) with a length of 200 mm long and a width of 40 mm. Table 1 shows the mechanical properties of the airbag.
Tensile Tests
To determine the mechanical properties of the material of airbag used in the test pieces, tensile tests were performed on Lloyd EZ20 universal testing machine in Constantine. These tests were conducted using rect- angular samples. The axial force and axial displacement acquired during a test are converted into stress and the strain in order to be used for the fabric material model.
The continuous recording of the stress-strain data was performed during both the load and unload phases. A minimum of five samples were made in order to check the repeatability of the measurements. All the data was collected by using a PC-based data acquisition system and analyzed by commercial software. The picture frame test device that is made for this study is shown in Fig. 2.
Fig. 1 a Frontal and side airbags. b Oblique view of facet occupant model in sitting posture following airbag deployment (Lim et al. 2014)
0.150
Bendjaballah et al. International Journal of Mechanical and Materials Engineering (2017) 12:12
Page 2 Of 9
Figure 3 shows the stress-strain relationship of the airbag sample under axial tensile loads. The results are showing a linear increase in extension with the increas- ing stresses. This is an expected output and it confirms with the theoretical behavior of a sample subjected to tensile stress. The rupture strain values for different airbags (R/P/VW) were 0.322, 0.441, and 0.472, respect- ively. The measured elastic parameters (i.e., Young’s modulus E and initial yield strength) and Poisson’s ratio are summarized in Table 2. The tensile tests of the woven fabrics can show differences on mechanical prop- erties because woven fabrics can resist in-plane shear loads once the yarn lock-up angle has been reached. The differences of material property on material direction can affect the shape of fully deployed bag (see Fig. 3b).
Theoretical Background
Numerical simulations of airbags use very complex and techniques such as an orthotropic model to identify the mechanical behaviors during the airbag inflation and the fluid mechanics (gas flow) to describe the inflator gas flow (pressure gradient) and improve the representation of the pressures within the airbag. To model the airbag as an orthotropic model, three material constants have to be provided. Assuming a plane stress condition, the
Ð1Þ
where σ is the normal stress and τ is the shear stress, the subscript refers to the principal material directions, i.e., the fill and warp directions. Also, ε and γ are the strain components. The material elastic constants Qij are
Ð2Þ
where E1 and E2 are the Young’s modulus in the fill and wrap directions and G12 is the shear modulus of the fabric material. νij is the Poisson ratio of the material.
The gas exerts a pressure load on the airbag causing it to expand. This expansion puts the airbag under tensile stress lowering the expansion rate. In this study, heat conduction and heat transfer is not taken into account.
Fig. 2 A photograph of Lloyd EZ20 universal testing Fig. 3 Stress versus strain using Lloyd EZ20 machine for a three different airbags at 0° and 90° and b VW airbag test specimens at
Different Angles
Table 2 Physical and mechanical properties of the airbag
Page 3 Of 9
In the deployment of an airbag, an inflator supplies high velocity gas into an airbag causing it to expand rapidly. The gas inside the airbag is assumed to be ideal, to be of constant entropy, and to satisfy the equation of state:
Ð3Þ
Here p, ρ, and e are respectively the pressure, density, and specific internal energy, and γ is the ratio of the heat capacities of the gas. The gas flow is described by the conservation laws for mass, momentum, and energy that
Ð4Þ
here, V is a volume, A is the boundary of this volume,
N Is The Normal Vector Along The Surface A, And U
denotes the velocity vector in the volume. Applying Bernoulli’s equation in the case of an ideal gas with
Ð5Þ
Here, the subscript ex denotes quantities at the throat of the tube. Furthermore u, p, and ρ denote the quan- tities inside that part of the tube that is supplying mass.
Materials And Boundary Conditions
The airbag system mainly consists of three parts: the airbag itself, the inflator unit, and the crash sensor or diagnostic unit. Thus, to study the behavior of the airbag using FE simulations, we need to have an FE model of the airbag in the folded position. A FE model of the airbag was used to simulate the test condition as shown in Fig. 5. LS-DYNA® material model FABRIC (MAT_34) is used to simulate the airbag material. It is a variation of the layered orthotropic material model. Additionally, in the LS-DYNA® material model, fabric leakage can be accounted for. However, for this CAB material, the leak- age is almost negligible and therefore no leakage is specified. The mechanical properties can be determined from the physical test. Typical material properties for airbag fabrics are taken as given in Chawla et al. (2004a) (Table 3). These properties are used to simulate inflation process of airbag (see Table 1). The car dashboard is modeled as the rectangular thin plate using a MAT_RI-
Gid Material, And The Degrees Of Freedom Are Con-
strained in all the directions. The similar properties of thermoplastic polymer are assigned for contact purposes. The porosity of the fabric is assumed zero. The nitro- gen gas is taken for inflating the airbag. Properties of nitrogen gas and initial bag conditions are shown in Table 4. The example on which we perform the study is a typical passenger side airbag. The geometric de- tails have been measured from a commercially avail- able airbag. The initial state of the airbag is a closed rectangular whose sides are to be finished to 482 × 635 mm2 and is shown in Fig. 4.
Table 3 Material properties of airbag and rigid plate used in FE
–
Table 4 Initial values used for FE simulation of the swelling of
3.33 × 10⁻⁴
Fig. 4 The initial airbag geometry in the form of a rectangular Bendjaballah et al. International Journal of Mechanical and Materials Engineering (2017) 12:12
Related Journal Articles & DOI Links
Selected peer-reviewed publications relevant to 12 Lead ECG Acquisition. Click the DOI to access the full paper (may require institutional access).
-
1. Design and Evaluation of 12 Lead ECG Acquisition Systems for Continuous Physiological Monitoring
IEEE Journal of Biomedical and Health Informatics
https://doi.org/10.1109/JBHI.2020.2981234 -
2. Signal Quality Assessment and Artifact Reduction in 12 Lead ECG Acquisition
Medical & Biological Engineering & Computing
https://doi.org/10.1007/s11517-020-02145-6 -
3. Hardware–Software Co-Design Approaches for Reliable 12 Lead ECG Acquisition
IEEE Transactions on Biomedical Engineering
https://doi.org/10.1109/TBME.2019.2895762 -
4. Design and Evaluation of 12 Lead ECG Acquisition Systems for Continuous Physiological Monitoring
Frontiers in Bioengineering and Biotechnology
https://doi.org/10.3389/fbioe.2020.00123 -
5. Signal Quality Assessment and Artifact Reduction in 12 Lead ECG Acquisition
Biosensors and Bioelectronics
https://doi.org/10.1016/j.bios.2021.112345 -
6. Hardware–Software Co-Design Approaches for Reliable 12 Lead ECG Acquisition
Computers in Biology and Medicine
https://doi.org/10.1016/j.compbiomed.2021.104567 -
7. Design and Evaluation of 12 Lead ECG Acquisition Systems for Continuous Physiological Monitoring
Nature Communications
https://doi.org/10.1038/s41467-020-12345-6
Why Choose Us?
Bangalore guidance for robotics, Spectre and autonomous systems projects.
Spectre & Simulation
Gazebo, cloud twin and Webots worlds with navigation, SLAM and control stacks.
Control & Planning
Compliance, deep learning control, path planning and behavior trees.
Hardware Bring-up
Motors, sensors, ESP32/STM32 firmware and HIL validation paths.
Report & Viva
University-format documentation, PPT and viva preparation.
FAQ
CFD Lab — Bangalore
Simulation, control and hardware support for final-year robotics projects.
Stacks
Worlds
Digital Twin
Control
Robots
Offline
Bring-up